Author Topic: 73 Challenger restomod  (Read 78488 times)

Offline dave73chally

  • Sr. Member
  • ****
  • Posts: 1304
Re: 73 Challenger restomod
« Reply #210 on: August 08, 2016 - 09:37:10 AM »
Cool, I'll follow the thread.  I just bought and installing TTI 3inch x pipe header to tip.


Sent from my iPhone using Tapatalk


Nice. Yea I ordered the adapter kit to fit the tti x pipe to the hedman headers. My plan is to run the x pipe, then y pipe to cutouts with a boom tube tip out the side. Then behind the cutout have dynomax super turbos with turn downs right before the rear axle. Something like this:
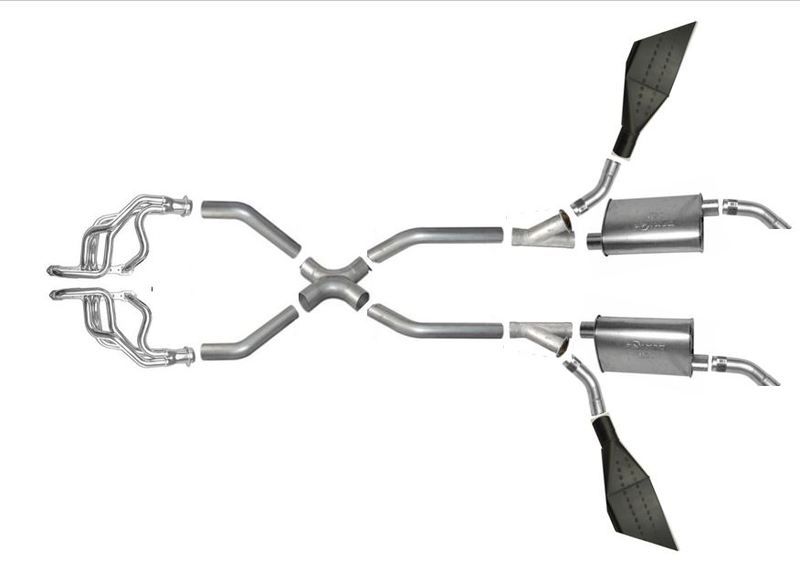

May eventually route the exhaust over the axle and add resonators to have it somewhat quieter when the cutouts are closed.
73 Challenger
512 / 4spd / Hotchkis & QA1 Suspension


Offline lulurocks

  • Jr. Member
  • **
  • Posts: 328
Re: 73 Challenger restomod
« Reply #211 on: August 08, 2016 - 09:44:53 AM »
Looking good  :droolingbounce:

Offline twalker

  • Full Member
  • ***
  • Posts: 810
Re: 73 Challenger restomod
« Reply #212 on: August 08, 2016 - 10:50:17 AM »
Nice. Yea I ordered the adapter kit to fit the tti x pipe to the hedman headers. My plan is to run the x pipe, then y pipe to cutouts with a boom tube tip out the side. Then behind the cutout have dynomax super turbos with turn downs right before the rear axle. Something like
May eventually route the exhaust over the axle and add resonators to have it somewhat quieter when the cutouts are closed.


Awesome.  Keep us posted


Sent from my iPhone using Tapatalk

Offline dave73chally

  • Sr. Member
  • ****
  • Posts: 1304
Re: 73 Challenger restomod
« Reply #213 on: August 09, 2016 - 08:19:11 AM »

Only issue I can't resolve is my volt gauge is always reading 12v. When I turn the key it resets and goes to 12v but then when I turn the key off it stays there. If I disconnect the battery, it stays there. I'm going to call speedhut as I can't think of anything other than the gauge being faulty?


Update: Called speedhut and they confirmed the volt gauge is working properly. Per the rep, it would only sweep to 0 if all voltage was lost prior to the car being shut off. The fuel, water temp, and oil temp all sweep to 0 when shutoff and that also is normal. Go figure
73 Challenger
512 / 4spd / Hotchkis & QA1 Suspension

Offline WildJones

  • Jr. Member
  • **
  • Posts: 227
Re: 73 Challenger restomod
« Reply #214 on: August 09, 2016 - 01:11:31 PM »
Car is looking great! Be sure to post some video once you fire it up!

Sent from my Nexus 6P using Tapatalk

Mike
95682
1970 Cuda

Offline dave73chally

  • Sr. Member
  • ****
  • Posts: 1304
Re: 73 Challenger restomod
« Reply #215 on: August 09, 2016 - 10:09:01 PM »
Here's the gauges at night, so sweet!


Accidentally turned the key too far and the starter cranked, so atleast I know I wired it somewhat right so far  :grinno:
73 Challenger
512 / 4spd / Hotchkis & QA1 Suspension

Offline Mickm

  • Jr. Member
  • **
  • Posts: 257
Re: 73 Challenger restomod
« Reply #216 on: August 09, 2016 - 10:12:54 PM »
Gauges look sweet Dave! I am hoping to fire mine within the next week or so. Maybe mine will look as good as your lol.

Cheers!
Mickm
MickM

Offline brads70

  • C-C.com Expert
  • ********
  • Posts: 18747
Re: 73 Challenger restomod
« Reply #217 on: August 09, 2016 - 10:24:07 PM »
 :iagree:  Nice gauges!  :2thumbs:
Brad
1970 Challenger 451stroker/4L60 auto OD
Barrie,Ontario,Canada
Proud to own one of the best cars ever made!!!!!

My restoration thread 
http://www.cuda-challenger.com/cc/index.php?topic=59072.0
 My handling upgrade post
http://www.cuda-challenger.com/cc/index.php?topic=73985.0

Offline GoodysGotaCuda

  • Sr. Resident
  • ******
  • Posts: 5392
Re: 73 Challenger restomod
« Reply #218 on: August 09, 2016 - 10:34:20 PM »
Nice. Yea I ordered the adapter kit to fit the tti x pipe to the hedman headers. My plan is to run the x pipe, then y pipe to cutouts with a boom tube tip out the side. Then behind the cutout have dynomax super turbos with turn downs right before the rear axle. Something like this:


May eventually route the exhaust over the axle and add resonators to have it somewhat quieter when the cutouts are closed.

Having had axle dumps before, I will never do that again. It's Loud! Though I do have a double-overdrive now, which could sway my opinion.
Build Page: Goody's 'Cuda Build Page
1976 Dodge Warlock
1972 Barracuda - 5.7 Hemi + T56 Magnum

Wheel & Tire Specs:Link

Offline AU6pack

  • Jr. Member
  • **
  • Posts: 172
Re: 73 Challenger restomod
« Reply #219 on: August 11, 2016 - 01:20:34 AM »
Super nice project  :thumbsup: Have you sourced the boom tips yet? Can you give he the heads up on where to source some as they are what I am looking for too.
Craig
Melbourne, Australia
1970 Challenger 416 6 pak
Resto thread - http://www.cuda-challenger.com/cc/index.php?topic=114787.0

Offline dave73chally

  • Sr. Member
  • ****
  • Posts: 1304
Re: 73 Challenger restomod
« Reply #220 on: August 11, 2016 - 08:11:31 AM »
Super nice project  :thumbsup: Have you sourced the boom tips yet? Can you give he the heads up on where to source some as they are what I am looking for too.

Only place I've found is dr. gas out in utah. They are a little pricey but look well made and will give great ground clearance for a side exhaust. Classic industries sells them as well, my plan is to have them price match dr. gas and deal with classic. I've tried to call dr. gas 3 times and haven't been able to get a person on the phone  :dunno: Classic told me they'd price match and I'd have them in a week.
73 Challenger
512 / 4spd / Hotchkis & QA1 Suspension

Offline Rdchallenger12

  • Jr. Member
  • **
  • Posts: 446
Re: 73 Challenger restomod
« Reply #221 on: August 11, 2016 - 09:22:41 AM »
Here's the gauges at night, so sweet!


Accidentally turned the key too far and the starter cranked, so atleast I know I wired it somewhat right so far  :grinno:


I may have missed it in an earlier post, But how was the fitment and wiring up for the new gauges? I'm assuming from Speedhut?

Offline rhamson

  • Jr. Member
  • **
  • Posts: 404
Re: 73 Challenger restomod
« Reply #222 on: August 11, 2016 - 09:28:09 AM »
Re-installed the louvers and ducktail spoiler. It's filthy but I love how it looks so I had to take a few pics!! I have 2 sets of tail lights so I smoked one set for the heck of it. What combo do you like best?

All smoked out:


Inside smoked:


All red, thinking this looks best:


On a different note, I'm not too happy with how my aftermarket amd rear valance is fitting. I feel like the center is somewhat "sagging". Should it be up and/or pulled in a bit to lessen the gap between the valance and bumper? Maybe I'll make some quick brackets to accomplish that?

Thank you for posting the aftermarket rear valance. I have not gotten to that yet but it is a good heads up. I got an AMD valance and filled in the bumperette holes and had not thought of the sagging issue yet. I may add some sheet metal filler to get it behind the bumper. I am almost to that stage when I get the car off of the rotisserie. I have a '72 and I love the grilles and tailights on these years. Your car looks killer.

Offline Mopar Mitch

  • Autocrosser/Road Course Racer
  • Full Member
  • ***
  • Posts: 682
Re: 73 Challenger restomod
« Reply #223 on: August 11, 2016 - 11:19:45 AM »
Dave73 -- Nice build!!!
Autocross/road racers go in deeper... and come out harder!

See  MOPAR ACTION MAGAZINE, AUGUST 2006 ISSUE for featured article and details on my autocross T/A.

Offline dave73chally

  • Sr. Member
  • ****
  • Posts: 1304
Re: 73 Challenger restomod
« Reply #224 on: August 11, 2016 - 12:51:24 PM »
I may have missed it in an earlier post, But how was the fitment and wiring up for the new gauges? I'm assuming from Speedhut?

A few pages back I have the wiring diagram I drew up with help of lulurocks. I followed that and it worked perfectly. As far as fitment, there I had gauge pods 3d printed them glued them to the backside of the instrument panel. That's in a previous post as well  :thumbsup:
73 Challenger
512 / 4spd / Hotchkis & QA1 Suspension