Author Topic: Progress on the Chilly-Challenger!  (Read 3174 times)

Offline e-tek

  • Jr. Member
  • **
  • Posts: 356
  • My website: http://edanneberg.googlepages.com/home
    • E-Tek Resto's
Progress on the Chilly-Challenger!
« on: July 07, 2008 - 04:35:44 PM »
:I welded on after market quarters to my Challenger, crimped 'em nice, finished them in and out with VERY little filler and THOUGHT everything was fine....until I went to re-install the rear valence. %$&(@!

Now I know aftermarket/jobber panels always need some tweaking, but this is rediculous!! The panels don't line up to the valnce at all! The areas for bolt/clip holes are different on both sides and one side didn't even HAVE holes!. So I'm trying to re-fabricate the %$#^ quarters including welding new tabs, drilling holes and more!

The second thing is, as I was fitting the rear bumper, I noticed it sure sits far from the body. It has rubber filler panels that take up all this room, but I had thought of both smoothing the bumper and tucking it closer to the body and eliminating the fillers.

My question Is: has anyone reading done either? Do you have any pics - either in-process or finished of this type of work? Even if it's a different vehicle - any bumper-tuck or smoothing pix would be great!

Here's what I have now:
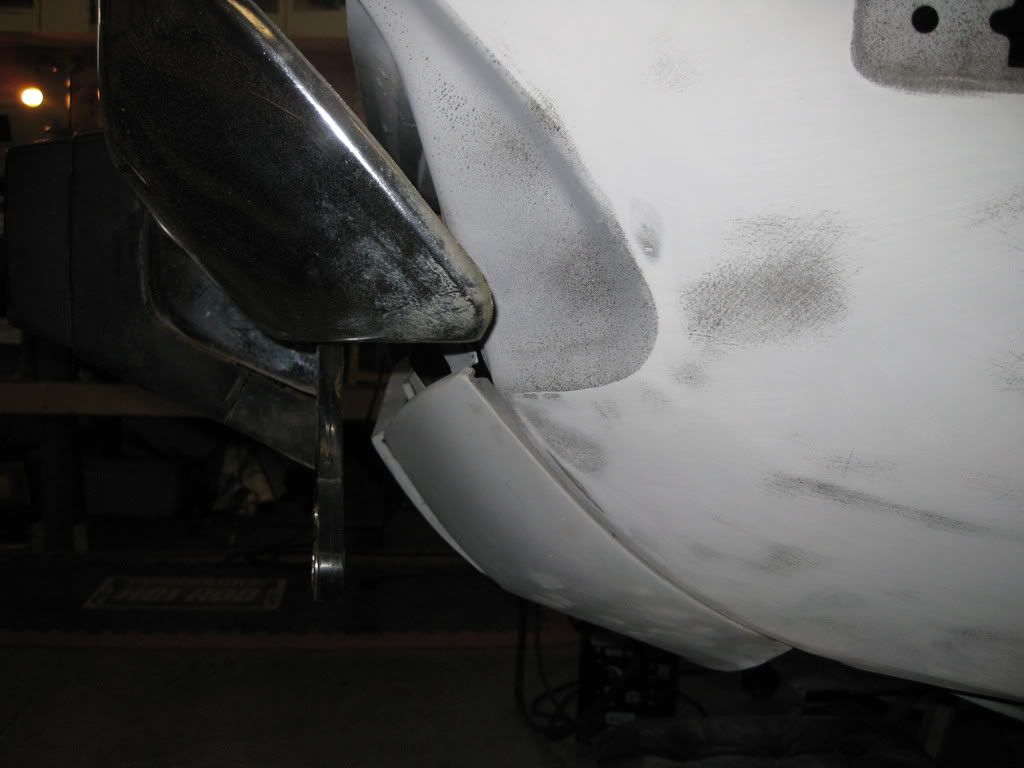


Thanks for any help!!!
« Last Edit: July 19, 2008 - 12:30:21 AM by e-tek »


craigsmytcudas

  • Guest
Re: *$*%^ Aftermarket (qtr) Panels!!!
« Reply #1 on: July 07, 2008 - 05:44:47 PM »
sorry for your dilemma. to flush up a bumper requires some work usually cutting the bumper in one to three areas and some trimming . if you forgot to install the less than ideal valance before drawing in the quarters and using the alignment hole in the center of the valance to the rear cross brace .i would not attempt this mod but good luck .oh yeah to soften the blow i have looked at two cars at different shops that made this same  mistake just cut the qtrs loose at the lower extensions install your valance and some dolly work is also needed on the rolled edges of the valance .     

Offline Lunchbox

  • Sr. Member
  • ****
  • Posts: 1948
Re: *$*%^ Aftermarket (qtr) Panels!!!
« Reply #2 on: July 07, 2008 - 05:48:25 PM »
What brand are they, Goodmark?

Offline troutstreamnm

  • Sr. Member
  • ****
  • Posts: 1190
Re: *$*%^ Aftermarket (qtr) Panels!!!
« Reply #3 on: July 07, 2008 - 07:36:40 PM »
Sorry to hear of your problems.  I installed an aftermarket rear valance and it did not line up well with the original quarters.  I need to redrill mounting holes in the valance because they do not line up properly with the mounting holes  :swear:  I feel your pain  :villagers:
08 SRT-8 Challenger
71 GA4 Challenger
70 FK5 Charger 500

Offline e-tek

  • Jr. Member
  • **
  • Posts: 356
  • My website: http://edanneberg.googlepages.com/home
    • E-Tek Resto's
Re: *$*%^ Aftermarket (qtr) Panels!!!
« Reply #4 on: July 07, 2008 - 10:07:37 PM »
Thanks for the replies and the shared pain guys! I should have been more clear - the Quarters are aftermarket (Goodmark) and the Valence is original. As for that valence, I had cut the centre brace out to replace some rusted metal behind it, then welded it back on. It's not done yet as I knew it would tale at least a little work to fit it (but not 40 hours!!), plus I wanted to make some exhaust cut-outs to fit the duals - but you're right, it needs dolly work on the edge! Guess all I can do is move the holes and/or weld tabs until it lines up.
Aren't earlier bumper brackets shorter - to bring bumper closer to body? If not, I might cut these to suck the bumper up close and get rid of the rubber fillers. I also want to smooth the bumper and maybe paint it body colour (white) - what do you think?

Offline conv340

  • Jr. Member
  • **
  • Posts: 331
    • Myspace CaMopar
Re: *$*%^ Aftermarket (qtr) Panels!!!
« Reply #5 on: July 08, 2008 - 12:37:20 AM »
Thats frustrating :stomp: I did Cuda quarters on my car ( very modified ) I assembled every thing many times before welding and they seemed pretty close. I can relate to the time I wont tell you how many hours I have  :22yikes: But if you have patients you can do anything. I fit my bumper like you want to do it's a lot of work but rewarding! Whats a few more hours!  :faint:
Two models, Two makes, One year, One body.

craigsmytcudas

  • Guest
Re: *$*%^ Aftermarket (qtr) Panels!!!
« Reply #6 on: July 08, 2008 - 10:14:19 PM »
mr 340 i like the work you have done since its custom have you thought about flushing out the side markers with harley  fender  lights ,they look like the 70 red and amber reflective inserts but leds looks cool and easy .

Offline e-tek

  • Jr. Member
  • **
  • Posts: 356
  • My website: http://edanneberg.googlepages.com/home
    • E-Tek Resto's
Re: *$*%^ Aftermarket (qtr) Panels!!!
« Reply #7 on: July 10, 2008 - 07:32:47 PM »
OK, so your pix finally downloaded to my computer and MAN is that some beautiful work - I can only pretend to be that talented and them hope mine comes out something like that!! I just came in  for sup after cutting down and re-bending the brackets to suck the bumper up. Gotta weld them up tonight and I'll post it all later. I also took better pix of the ends of the Qtrs to show you exactly what I've been *****in' about.
Thanks again!
BTW - I see I've posted this in two spots, so I'm updating both threads simultaneously!

Offline conv340

  • Jr. Member
  • **
  • Posts: 331
    • Myspace CaMopar
Re: *$*%^ Aftermarket (qtr) Panels!!!
« Reply #8 on: July 10, 2008 - 08:57:57 PM »
Quote
have you thought about flushing out the side markers with Harley  fender  lights

I'm not sure about the Harley lights?  ???  but I have done a lot of thinking about how far to go with smoothing and modifying the lights and, well, just about every thing else to  :lol2: But for the most part I want to keep all the Mopar goodies intact. Just make them fit better and smoother. For example the markers. I decided to smooth the housing into the body, ( no seems.) but use the factory lenses. I will be using LEDs to light them.  :thumbsup:
Quote
I just came in  for sup after cutting down and re-bending the brackets to suck the bumper up. Gotta weld them up tonight and I'll post it all later. I also took better pix of the ends of the Qtrs to show you exactly what I've been *****in' about.
The fact that your trying to do the quarters yourself and improve on the fitment sounds like you've got lots of talent to me  :ylsuper: I look forward to seeing the pics. I have had plenty of backtracks on my project and it can be very  :pullinghair: but over all ( especially when it finally comes out the way you want!) it's very gratifying.  :cheers:
If you haven't found it all ready check out the Twisted Fish post Thats My project thread. I also have lots of pics on http://www.flickr.com/photos/brinkenterprise/
« Last Edit: July 10, 2008 - 10:27:08 PM by conv340 »
Two models, Two makes, One year, One body.

Offline e-tek

  • Jr. Member
  • **
  • Posts: 356
  • My website: http://edanneberg.googlepages.com/home
    • E-Tek Resto's
Re: Progress on the Chilly-Challenger!
« Reply #9 on: July 19, 2008 - 12:38:01 AM »
Making some progress on the Chilly-Challenger. With my limited fabricating skills, I managed to cut down the rear bumper brackets to fit the bumper closer to the body (al la 70-71), then cut up the rear valence to snug it up, close the bumperette gaps and open some exhaust cut-outs.

You can see the before pic above - bumper was 3" from body.
After:


"Almost" after:


Wow - looking at those EXTRA LARGE, CLOSE-UPs, kinda makes one sick to see the poor welding!! Oh well, with some copper in behind I filled the gaps and holes and got er' partially ground down. This weekend I'll do some hammer and dolly work, a little more welding and grinding, then some filler - hopefully I can hide all this!

Offline ShelbyDogg

  • Sr. Resident
  • ******
  • Posts: 5007
Re: Progress on the Chilly-Challenger!
« Reply #10 on: July 19, 2008 - 09:50:42 AM »
e-tek,
I can see why your welding isn't coming out too nice. You need to clean the metal on both sides, front and back before you weld. Any dirt, primer, paint, etc gets into your weld puddle and blows it out. You left your e-primer on that part. I even have a problem with weld-thru primer screwing my welds up
 Also, when butt welding, you have to keep a little gap between the 2 pieces. The gap will be filled with your welding wire. This will allow you to grind away any lumps and not grind away the new metal holding the parts together. Use a cutoff disk to open up any gaps that start to close as you go along.

Keep us posted on the progress.
Rob
Rob

3 E-bodies, Megasquirt-1v3.0, Edelbrock Pro-Flo-1, Holley C950, FAST EZ-EFI; say no to carbs...yes to throttle bodies

My Pace Car restoration thread:
http://www.cuda-challenger.com/cc/index.php?topic=44869.0


Offline ksierens

  • Sr. Member
  • ****
  • Posts: 1408
    • 70 Challenger Resurrection
Re: Progress on the Chilly-Challenger!
« Reply #11 on: July 19, 2008 - 12:17:23 PM »
You might also try using Twenty-Gauge brand wire, works great!
1970 Triple Black Challenger R/T  440 Six Pack - 4 Speed - 3.55 Dana
Kurt - SE Michigan

Offline CHUCKS71

  • Sr. Member
  • ****
  • Posts: 1123
  • "IF YOUR NOT FIRST YOUR LAST"
Re: Progress on the Chilly-Challenger!
« Reply #12 on: July 19, 2008 - 12:28:19 PM »
e-tek,
I can see why your welding isn't coming out too nice. You need to clean the metal on both sides, front and back before you weld. Any dirt, primer, paint, etc gets into your weld puddle and blows it out. You left your e-primer on that part. I even have a problem with weld-thru primer screwing my welds up
 Also, when butt welding, you have to keep a little gap between the 2 pieces. The gap will be filled with your welding wire. This will allow you to grind away any lumps and not grind away the new metal holding the parts together. Use a cutoff disk to open up any gaps that start to close as you go along.

Keep us posted on the progress.
Rob

:iagree:I use .023 wire in my mig It doesn't burn through like .035 will.here are some tools from Eastwood that could help you.
http://www.eastwoodco.com/shopping/product/detailmain.jsp?itemID=1159&itemType=PRODUCT&iMainCat=608&iSubCat=609&iProductID=1159

http://www.eastwoodco.com/shopping/product/detailmain.jsp?itemID=1219&itemType=PRODUCT&iMainCat=608&iSubCat=609&iProductID=1219
:burnout::22yikes::burnout:    www.ronpaul2008.com
71 Challenger 4spd   www.conservativepunk.com
03 Ram diesel 6spd    http://s105.photobucket.com/albums/m222/chucknutz/1971%20Challenger/

Offline ShelbyDogg

  • Sr. Resident
  • ******
  • Posts: 5007
Re: Progress on the Chilly-Challenger!
« Reply #13 on: July 19, 2008 - 04:35:00 PM »
I bought those butt-weld clamps at Harbor Freight. I think they were $4.99 for a pack of 8. They also have the Cleco pliers there sometimes on sale for $2.99 but don't sell any clecos there yet.
Rob

3 E-bodies, Megasquirt-1v3.0, Edelbrock Pro-Flo-1, Holley C950, FAST EZ-EFI; say no to carbs...yes to throttle bodies

My Pace Car restoration thread:
http://www.cuda-challenger.com/cc/index.php?topic=44869.0


Offline lazerboat

  • Jr. Member
  • **
  • Posts: 39
  • whatz done is done
Re: Progress on the Chilly-Challenger!
« Reply #14 on: July 19, 2008 - 05:10:57 PM »
it looks like to me your welding with flux core , if so you need to get argon co2 mix a world of diffrence ,