Author Topic: Restoration of an origonal owner 73 Challenger Rallye  (Read 195207 times)

Offline 73RallyeChallenger

  • Jr. Member
  • **
  • Posts: 236
Re: Restoration of an origonal owner 73 Challenger Rallye
« Reply #360 on: June 06, 2012 - 01:54:27 PM »
My proportioning valve was completely shot. All the rubber seals inside were toast. We are currently looking for a used replacement. I called In-line tube to order a replacement and they said that there was only 1 manufacture of the prop valve for the 72, 73-74 prop valves and they discontinued them due to a problem with the right disc brack locking up. So now we are back to searching for used valves.
73 Triple Black 340 Challenger
70 Plum Crazy T/A Challenger - work in progress (AGAR)


Offline burdar

  • Sr. Resident
  • ******
  • Posts: 5925
Re: Restoration of an origonal owner 73 Challenger Rallye
« Reply #361 on: June 06, 2012 - 02:00:31 PM »
The only o-rings I found were right under the fittings that unscrew from the body.  You should be able to match those up at a parts store.  What was the issue with yours?  Was fluid not passing through it...was it leaking?   

Offline 73RallyeChallenger

  • Jr. Member
  • **
  • Posts: 236
Re: Restoration of an origonal owner 73 Challenger Rallye
« Reply #362 on: June 06, 2012 - 03:03:20 PM »
The mechanic based his decision to replace based on a visual inspection of the guts. I'm not sure if it was just the rubber that was pooched or if it was the springs or rods.
73 Triple Black 340 Challenger
70 Plum Crazy T/A Challenger - work in progress (AGAR)

Offline burdar

  • Sr. Resident
  • ******
  • Posts: 5925
Re: Restoration of an origonal owner 73 Challenger Rallye
« Reply #363 on: June 06, 2012 - 03:09:59 PM »
I didn't see how you could remove anything other then the exterior fittings.  I used to have one from an 82 Cordoba that was almost identical.  I would think any RWD into the 80's would be usable.

Offline EB3-GranCoupe

  • Sr. Member
  • ****
  • Posts: 1435
  • BP23 U0B
Re: Restoration of an origonal owner 73 Challenger Rallye
« Reply #364 on: June 06, 2012 - 09:01:17 PM »
i have an extra inline repro valve from my 1970.  i don't know if they are the same or not.  let me know if you cn use it.

Offline burdar

  • Sr. Resident
  • ******
  • Posts: 5925
Re: Restoration of an origonal owner 73 Challenger Rallye
« Reply #365 on: June 06, 2012 - 11:11:23 PM »
Finished up the DS exhaust tonight. Again, we started at the front and it went right together.  Got the rear valance back on and installed the tips too.

I got a call today saying the radiator is done.  I'll go pick that up Saturday morning.  Once that's installed and fluids are added, the engine is ready to start.

Offline burdar

  • Sr. Resident
  • ******
  • Posts: 5925
Re: Restoration of an origonal owner 73 Challenger Rallye
« Reply #366 on: June 07, 2012 - 09:29:02 AM »
How much clearance should there be from the top of the exhaust tips to the rear valance?  I'm wondering if I need to put a spacer in between the rear hanger and the trunk floor to drop the tips a little.  Right now I have about 3/16" clearance?  Is that enough or will the valance get too hot with them that close? 

ALso, what's a good inital setting for the torsion bars?  RIght now the adjusters are backed all the way out.  How far should I turn the bolts to start with so the car doesn't hit the bumpstops when I take it off the jack stands?
« Last Edit: June 07, 2012 - 09:48:08 AM by burdar »

Offline TUNISCO

  • Jr. Member
  • **
  • Posts: 42
Re: Restoration of an origonal owner 73 Challenger Rallye
« Reply #367 on: June 07, 2012 - 09:50:23 AM »
I'm sure my little anal mind would be trying to get them in there with equal clearance top, bottom and sides.

I don't think heat should be an issue, I've seen exhaust exit all manor of places, like cars for instance with pipes molded into the rockers.
« Last Edit: June 07, 2012 - 11:03:51 AM by TUNISCO »

Offline burdar

  • Sr. Resident
  • ******
  • Posts: 5925
Re: Restoration of an origonal owner 73 Challenger Rallye
« Reply #368 on: June 07, 2012 - 10:17:23 AM »
They're good side to side.  I just didn't know what was an acceptable clearance on top.  I see tips sticking out a bunch of different lengths too.  The factory muffler had a step in the end of it so the tips stuck out the same on every car.  I pushed mine in until the end of the muffler pipe touched the baffle in the tips.  They stick out about 3/8" which is about where they were from the factory I think.
« Last Edit: June 07, 2012 - 10:20:10 AM by burdar »

Offline burdar

  • Sr. Resident
  • ******
  • Posts: 5925
Re: Restoration of an origonal owner 73 Challenger Rallye
« Reply #369 on: July 07, 2012 - 01:10:45 AM »
Time for a small update on what I worked on this week.  Like a lot of times, I was just bored so I grabbed something and started working on it.

The door panel woodgrain was in OK shape but the corners were starting to curl.  I've had new woodgrain for years but never got around to installing it.  The new woodgrain was from Year One.


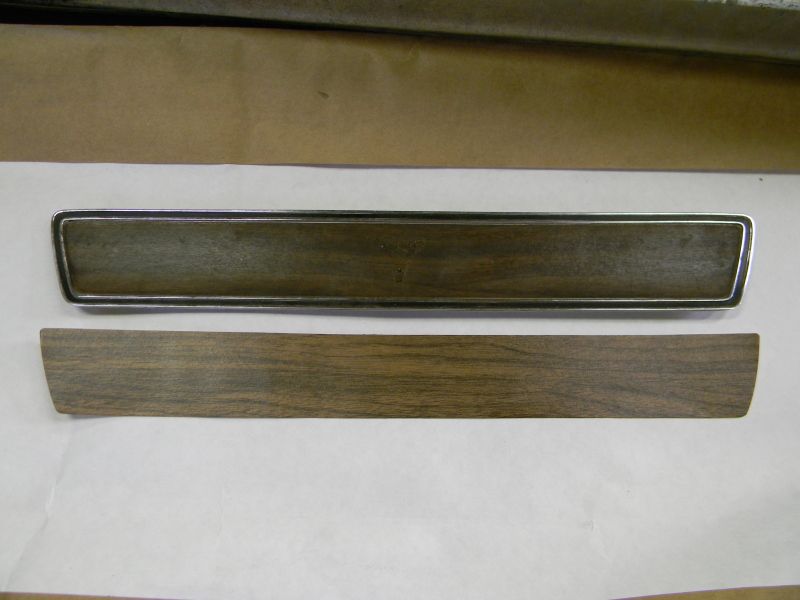
The original woodgrain was darker but it could have darkened up over the years.  The new woodgrain matches the color of the dash so I'm happy with it.
 

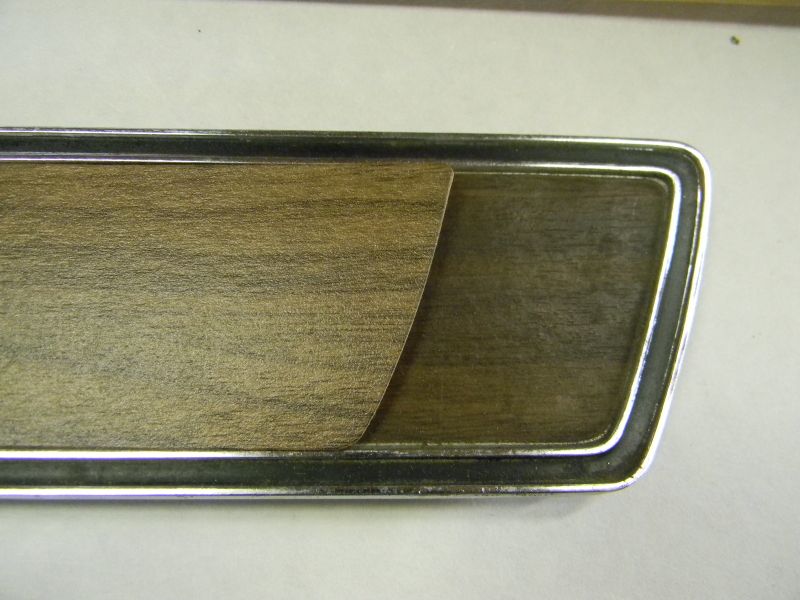
I read online that WD-40 works good at removing the old woodgrain so I saturated one piece with it.  I checked it after about 15 minutes and nothing was happening.  I got online and did another search.  I read where someone used paint stripper with good results.  So, I got out the paint stripper and after about 15 minutes, had a look at the decal.  It had started to loosen up but it wasn't working very fast.  That's when I had an idea.

I bought the wife one of those Shark hand held steem cleaners.  I dug it out of the closet, added water and plugged it in.  The woodgrain decals peeled right off with very little glue left behind.  I couldn't believe how great it worked.  For the small spots of glue left on the bezels, I used Un-Du.(Scrapper's Solution) It's for removing stickers and tape from scrapbooking projects.  It took the glue right off.

The bezels were in pretty good shape.  One of them didn't need any work.  The black paint around the edge was still like new.  The other side had a few little areas where the paint was scratched.  On that bezel, I just misted some SEM Trim Black onto it and wiped the access off the chrome sections.  After attaching the new woodgrain decals I turned my attention to the Fratzog emblems.  To remove them from the bezels I just used my angle grinder with a flap disc to grind down the pins in the back.  I still had a good amount of the pins left for reattachment.  I ended up used a very small amount of clear silicone to reattach the emblems.  I just put a small amount on a screwdriver and put a daub around each pin. Once the emblems were pushed into place, some silicone pushed out the sides which I figured would happen.  I let the silicone dry completely...it would have just smeared if I had tried to clean it up while it was wet.  Once it was dry I took a new razor blade and trimmed the excess off the edges.  It worked perfectly.       
« Last Edit: July 07, 2012 - 01:27:43 AM by burdar »

Offline burdar

  • Sr. Resident
  • ******
  • Posts: 5925
Re: Restoration of an origonal owner 73 Challenger Rallye
« Reply #370 on: July 07, 2012 - 01:24:35 AM »
Then I turned my attention to the door panels and rear interior panels.  The original panels were a little rough.  The drivers door panel and passengers rear panel were in the worst shape.  Although they will never look perfect, painting them with SEM paints really makes them look a lot better.  Since they end up being a uniform color, your eye isn't drawn to any lighter colored scratches.  New panels are on my list but that won't happen until the car is on the road.

I cleaned everything four times, used the SEM Adhesion Promotor per the instructions and finally sprayed them with SEM Landau Black. 


The referbished door panel woodgrain looks great in the panels but the new arm rest pads look awful.  The new pads are from Legendary.  I can't remember the brand though.  There were two options...one was from Palco.  I bought the other brand.  They are just a block of wood wrapped in vynal.  The original ones use a metal core.  The vynal isn't close to being the correct grain and the contour of the pad is not right.  I'll definately be cleaning up the original ones in the future.  One of the original ones is in great shape.  The other one is all torn underneith the inner lip.  I think I can glue it back together and it won't be seen once installed.

The new window fuzzies don't stay on the panels either.  I squeezed the "U" channel together a little more and that helped.  I'll probably have to use some weatherstrip adhesive to hold them tight though.


Offline dutch

  • Sr. Resident
  • ******
  • Posts: 6944
Re: Restoration of an origonal owner 73 Challenger Rallye
« Reply #371 on: July 07, 2012 - 02:32:32 AM »
looks beautiful as ever !
what brand fuzzys did you get?  Mine didn`t even have the U shape... just lay on to of the panel and fit like crap....   The shape of the rubber  on the outside is wrong too. It doesn`t even touch the glass properly. Gotta love spending $  on bad replacement parts huh  :P
got the motor running yet...?   :popcorn:
*** Bart ***

Offline GranCuda1970

  • Sr. Resident
  • ******
  • Posts: 5515
  • Rev 20:4. Mat 6:33 John 1:3 Mat 26:41
Re: Restoration of an origonal owner 73 Challenger Rallye
« Reply #372 on: July 07, 2012 - 07:39:36 AM »
Very Nice!

Offline burdar

  • Sr. Resident
  • ******
  • Posts: 5925
Re: Restoration of an origonal owner 73 Challenger Rallye
« Reply #373 on: July 07, 2012 - 08:18:58 AM »
The fuzzies are from First Place Auto Products.  They look very close to the original ones.  I've heard the ones from PUI aren't even close.  The only other issue I had with them were the small pieces ontop of the quarters.  Even then, it wasn't an issue with the fuzzies but a problem with the quarters.  The oval holes that the fuzzies are supposed to snap into weren't in the correct place.  I had to break off the clips and drill small holes into the fuzzies/quarters.  Once the glass in is, I think the screws will be hidden.

Offline Grec

  • The '73 Chrysler should have made...
  • Full Member
  • ***
  • Posts: 974
Re: Restoration of an origonal owner 73 Challenger Rallye
« Reply #374 on: July 07, 2012 - 02:10:59 PM »
Very nice. I just did all of that about 6 months ago. Nice to have a brand new-looking interior, huh? :-)

You left your frazogs chrome? Mine had traces of black paint so I repainted them. Not easy, as all the edges stay chrome, but they came out great.

You can see the black paint in the deeper corners in the original pic and the after below...

http://www.cuda-challenger.com/cc/index.php?topic=81484.msg816334#msg816334
« Last Edit: July 07, 2012 - 02:13:09 PM by Grec »
1973 Challenger Rallye
- 440 Six Pack
- A833 4 Speed, 18 Spline
- FE5 Rallye Red on Black