Author Topic: Restoration of an origonal owner 73 Challenger Rallye  (Read 195429 times)

Offline MOPAR FANATIC

  • Resident
  • *****
  • Posts: 4250
Re: Restoration of an origonal owner 73 Challenger Rallye
« Reply #45 on: August 27, 2009 - 06:57:33 PM »
 :ylsuper: EXCELLENT story and keep up the great work,sounds like your gonna get her done in no time and best of luck.your stories are an inspiration to all of us.makes me want to go home and get started on my 71 chally agaign.

thanks,and keep at it.  :cheers:

Dave......mopar fanatic.
71 Challenger 340 a/t
2013 Plum Crazy Hemi R/T 6SPD


Offline burdar

  • Sr. Resident
  • ******
  • Posts: 5925
Re: Restoration of an origonal owner 73 Challenger Rallye
« Reply #46 on: August 27, 2009 - 07:07:15 PM »
Thanks for all the kid words.  I don't know when the car will be done but I know if I have any problems putting it back together, I know who to ask. 

Here are some more updates on the bodywork.

After the inner fenders were installed the rocker panels were fixed as well as the the area right below the bottom door hinge.  If I remember right, the entire drivers side rocker was replaced up to where it attaches to the quarter panel.  Just the front section of the passengers side was replaced. 

In this first picture you can also see the repair that was done on the front of the door back in the late 70's or early 80's.  Dad had the car repainted at least once.  If you noticed, the door stripes are wrong in some of the first pics I posted.  That's because dad thought the origonal style stripes were too expensive to put back on after the repaint.  I have never seen the correct stripes on this car.  I always remember the solid ones.  The car is going to look strange to me with the strobes in place.


« Last Edit: August 28, 2009 - 06:21:11 PM by burdar »

Offline burdar

  • Sr. Resident
  • ******
  • Posts: 5925
Re: Restoration of an origonal owner 73 Challenger Rallye
« Reply #47 on: August 27, 2009 - 07:13:35 PM »
This is the door jam area that was rusted before. 


The only area of the floor that needed replacing was the drivers side front.  There was a good amount of pitting in that area.


Offline burdar

  • Sr. Resident
  • ******
  • Posts: 5925
Re: Restoration of an origonal owner 73 Challenger Rallye
« Reply #48 on: August 28, 2009 - 10:21:19 AM »
Pitting in the firewall was filled in and any rust was cut out and fresh metal was welded in.


Drivers side radiator support after being fixed.


Passengers side.

Offline Bullitt-

  • Permanent Resident
  • *******
  • Posts: 12167
  • Better Things To Come Member Since 2/16/06
Re: Restoration of an origonal owner 73 Challenger Rallye
« Reply #49 on: August 28, 2009 - 08:27:27 PM »
Your shop is doing some nice work....Any time frame as to when you get it back?  Are you doing the reassembly?
Wade  73 Rallye 340..'77 Millennium Falcon...13 R/T Classic   Huntsville, AL
Screwed by Photobucket!

Offline burdar

  • Sr. Resident
  • ******
  • Posts: 5925
Re: Restoration of an origonal owner 73 Challenger Rallye
« Reply #50 on: August 29, 2009 - 09:46:39 AM »
The shop is just doing the bodywork and paint.  I'm doing the rest.  I used to be a mechanic...so that stuff is gravy for me.  It's just the bodywork that I'm clueless on.

I'm not sure when the car is coming home.  Hopefully before Christmas. 

Offline burdar

  • Sr. Resident
  • ******
  • Posts: 5925
Re: Restoration of an origonal owner 73 Challenger Rallye
« Reply #51 on: August 30, 2009 - 05:48:56 PM »
The quarter panels were cut off next.  Because of the horrible job done previously, new Goodmark "full" quarters were installed instead of the skins.


Offline burdar

  • Sr. Resident
  • ******
  • Posts: 5925
Re: Restoration of an origonal owner 73 Challenger Rallye
« Reply #52 on: August 31, 2009 - 08:48:11 PM »
I've started cleaning up some of the smaller pieces so they are ready to go back on when I get the body back.  I bought some EvapoRust and have been soaking some brakets as well as the proportioning valve and vapor tank.

Here's the prop valve before I dipped it.
 

This is after soaking overnight.


This is the vapor tank used on late 72-74 Challengers.


Does anyone know what is inside these things?  I have a small pinhole in this one and don't know if I should try and find a replacement.  It sounds like there is a valve inside of it but when I blow compressed air into the four front tubes, NO air comes out of the 5th tube that leads to the charcole canister. 

Here is what it looks like after soaking all night.  I assume the yellow color is a chemical reaction and doesn't mean the tank was painted yellow from the factory.
   

I soaked it all day today and it looks way better than this but I don't know if it is junk inside.  Does anyone have a really clean one?

Offline burdar

  • Sr. Resident
  • ******
  • Posts: 5925
Re: Restoration of an origonal owner 73 Challenger Rallye
« Reply #53 on: September 01, 2009 - 12:47:59 PM »
OK, back to the quarters.

Here is a pic of the rocker panel under the drivers side quarter.  The other bodyshop had just installed new skins over this area. New metal was fabricated and welded in place of this rust on both sides.


I posted this next picture above but I'll post it again.  You can see the area right above the leaf spring shackles.  These were the only places on the trunk pan that were rusted.  The trunk sides were bad but the pan was in good shape.  This picture shows the trunk floor with the patch panels removed.  Also in this picture you can see that the rear frame rails and the rear filler panel have been cut out.


Here is what the trunk floor looked like.  Factory welds and all.
 

I really wanted to save the trunk floor if at all possible.  I just thought it would be a waist to remove it just because of the poor work that had been done before.  It turns out that they were able to save it.

The owner of the black 70 R/T that I showed pictures of earlier also has a 70 R/T six pack car.  It is in a lot worse shape than the black car was.  Years ago he bought a 2 piece trunk floor for that car before the 1 piece units were available.  Since almost everyone is installing the 1 piece units now, he wasn't going to use the floor that he had.  He sent the 2 piece floors to Ohio and the guys cut sections out of them to use on mine.  So the area right above the rear frames are new but the center section is my origonal trunk floor. 

Offline burdar

  • Sr. Resident
  • ******
  • Posts: 5925
Re: Restoration of an origonal owner 73 Challenger Rallye
« Reply #54 on: September 01, 2009 - 01:19:09 PM »
It's starting to look like a Challenger again.


Offline 70shaker6pk

  • Jr. Member
  • **
  • Posts: 178
Re: Restoration of an origonal owner 73 Challenger Rallye
« Reply #55 on: September 01, 2009 - 01:46:04 PM »
Keep posting those pic's,, your car is looking great!!
'JS23V0B'  1970 Challenger R/T N96 440 Six Pack

Offline NoMope Greg

  • Resident
  • *****
  • Posts: 3166
Re: Restoration of an origonal owner 73 Challenger Rallye
« Reply #56 on: September 01, 2009 - 02:44:13 PM »
I'm really enjoying your story.  :popcorn:  :thumbsup:
Greg
2003 Ford Escape XLS
Currently Mopar-less :(

Offline burdar

  • Sr. Resident
  • ******
  • Posts: 5925
Re: Restoration of an origonal owner 73 Challenger Rallye
« Reply #57 on: September 01, 2009 - 03:52:51 PM »
Thanks guys.

I really like reading restoration stories so I figured other people must like them too.

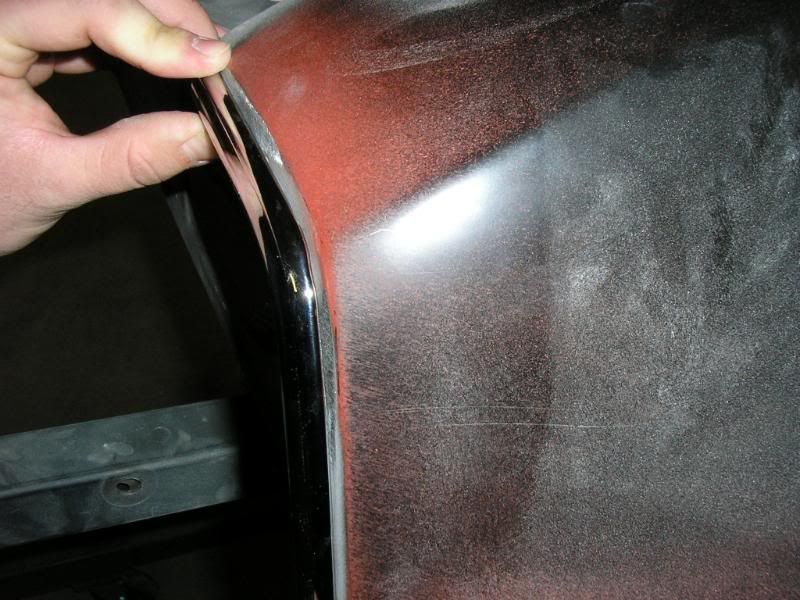
The Goodmark quarters seemed to be OK.  I've heard that AMD's are better but shop seemed to like them good enough.  The gas filler hole needed a little work and there was a small bodyline issue right above the side marker lights. 

When I sent the car out to Ohio I tried to send everything that I thought would be needed but didn't send the bumpers or the gas filler kneck.  I got an e-mail saying that before the quarters could be finished they wanted those pieces just to make sure everything fit the way it was supposed to.  I also bought new wheelwell trim, tail panel trim and side marker lights so they could be "fitted" to the car before paint.

So, earlier this year my dad and I took a weekend trip to Ohio to see the car and to bring out the bumpers and gas filler kneck.  Since the "full" quarters were being installed, I was a little concerned about the back window area.  I had heard a few stories about rear windows not fitting right and didn't want that to happen to me so...I also brought the rear window to test fit.

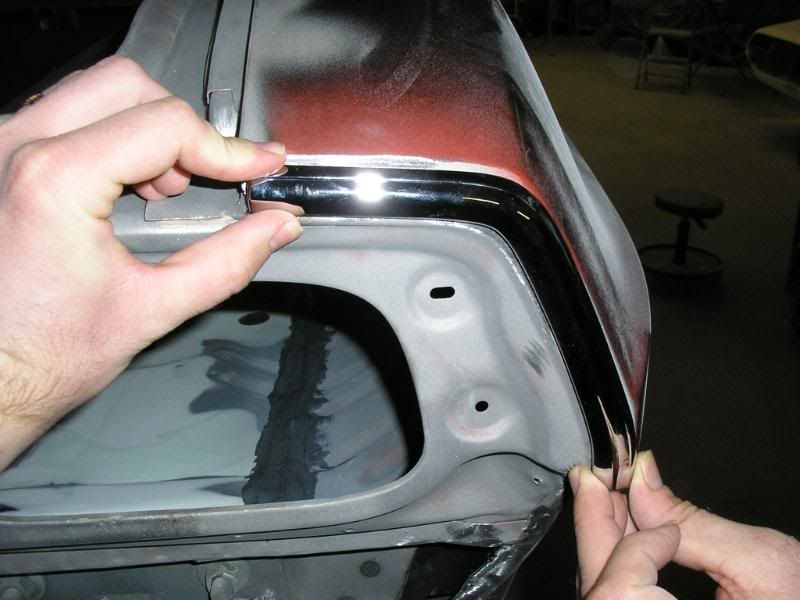
The window fit just fine...I guess you really only have to worry about the window when you are replacing more than just the quarters but I wanted to be sure.  When I was there, I held the 3 piece tail panel trim up to the quarters and the fit was great.  I got it from www.beaparts.com and couldn't be happier.  It also came with all of the mounting clips needed for installation.  Metro parts also sells the trim but it doesn't seem to fit very well.


The wheelwell trim came from R/T Spectialties and was pretty decent.  It took a little work to get it to fit, but all the new wheelwell trim seems to need a little work.

I got the side markers from Herb's parts and they fit pretty good too.  The quarter skins that were on the car before were really bad in the side marker light area.  The markers were shifter way forward.  The markers fit almost perfectly in the Goodmark quarters.  The mounting holes will only need a little work for the markers to fit 100% 


Offline burdar

  • Sr. Resident
  • ******
  • Posts: 5925
Re: Restoration of an origonal owner 73 Challenger Rallye
« Reply #58 on: September 04, 2009 - 01:14:08 PM »
Just a couple more pics for today.


Once the rear frame sections and rear filler panel were installed, the car was strong enough to be mounted on the roticery.  In this first picture you can see the areas of the trunk that were replaced with the sections cut from the old 2 piece floors.  The center of the trunk floor is origonal.
 

Here is an underside shot.  You can see that the rear framerails have been replaced as well as the rear filler panel.  There was a small problem with the filler panel that I'll go into later on.  In the pic, they are replacing rusted sections of the torsion bar x-member.

Offline burdar

  • Sr. Resident
  • ******
  • Posts: 5925
Re: Restoration of an origonal owner 73 Challenger Rallye
« Reply #59 on: September 11, 2009 - 10:04:07 AM »
OK...time for another update.

Once the car was on the roticerie, all the smaller rust issues were taken care of.  The torsion bar X-members was fixed and a small floorpan issue was resolved.  After all the metal replacement was done, the car went to the blasters.  The underside was blasted clean in preporation for paint.

Here the bottom is all clean and seam sealed ready for paint.


Rear frame repair sections


Another shot of the frame sections.


Torsion bar X-member has been fixed.


At some point in the cars life, the front sections of the rear floorpan were hammered up into the passengers compartment.  Why this was done...I have no idea but I can only assume it was done at the first shop that I took the car to.  Those areas were pushed back to where they were supposed to be and finished with a little filler.