Author Topic: Restoration of an origonal owner 73 Challenger Rallye  (Read 195423 times)

Offline Bullitt-

  • Permanent Resident
  • *******
  • Posts: 12167
  • Better Things To Come Member Since 2/16/06
Re: Restoration of an origonal owner 73 Challenger Rallye
« Reply #60 on: September 11, 2009 - 07:45:02 PM »
Those same areas of my floor pan are beat to heck while the more horizontal areas right next to them are pristine.... I surmised that rocks/debris from the front tires hit there.
Wade  73 Rallye 340..'77 Millennium Falcon...13 R/T Classic   Huntsville, AL
Screwed by Photobucket!


Offline Mentally Challenged

  • Sr. Member
  • ****
  • Posts: 1044
Re: Restoration of an origonal owner 73 Challenger Rallye
« Reply #61 on: September 11, 2009 - 08:58:32 PM »
Looking good  :2thumbs:
Chris, Ohio

Offline burdar

  • Sr. Resident
  • ******
  • Posts: 5925
Re: Restoration of an origonal owner 73 Challenger Rallye
« Reply #62 on: September 11, 2009 - 09:55:33 PM »
Quote
Those same areas of my floor pan are beat to heck while the more horizontal areas right next to them are pristine.... I surmised that rocks/debris from the front tires hit there.


You may be right.  It's weird that both sides were like that and those were the only two places.  It really does look like someone took a hammer to that area.  I just assumed that's what happened.

Well, earlier I said that there was a small problem with the rear filler panel.(the piece that the rear bumper bolts to)  When I ordered it, I thought I was getting a factory replacement part.  What I ended up with was a repair panel from "AutoRust Technisions."   That is the company that makes those frame "caps".  Anyway, once it was installed, the guys noticed that it was hanging down too low and was covering up some holes in the frame.   I knew that Best of Show was in the middle of restoring an AAR Cuda that was parked right next to my car so...I asked them to go measure the depth of that piece.  It turns out that the "AutoRust" piece was 3/4" too tall and the lip(that wraps around the back of the framerail) was too long.

We called up the company and they said they have sold loads of those pieces and havn't had a single callback on them.  My solution was to just notch the filler panel a little so that the bumper brackets would still be able to mount to the car.  You can't see that area anyway once the bumper and rear valence are installed so it wasn't a huge deal to me.  I had them notch the filler panel at an angle on the sides so it would look better than just cutting a square chunk out of it.

It is a little hard to see in this pic but the filler panels lip is too long and it covering the rear most hole in the framerail.  It is also hanging down 3/4" too low.
 

Offline rallye73

  • Jr. Member
  • **
  • Posts: 351
  • Model cars for the big boys!!
Re: Restoration of an origonal owner 73 Challenger Rallye
« Reply #63 on: September 11, 2009 - 11:08:46 PM »
My floor pans are beat up in the same area also.
John Moorman
1971 Challenger R/T 383 4 speed (waiting it's turn)
1973 Challenger Rallye 340 4 speed (undergoing full resto)
2003 Dodge SRT-4 Stage 3 turbo daily driver-been as fast as 11.97et
1995 Dodge Neon Sport Coupe DOHC 5 speed Nitro-yellow-green (one of 527 built)

Offline burdar

  • Sr. Resident
  • ******
  • Posts: 5925
Re: Restoration of an origonal owner 73 Challenger Rallye
« Reply #64 on: September 22, 2009 - 01:26:42 PM »
Well, I've been working on the upper control arms and just got them done.  With a 7 month old I'm finding it more difficult to get some garage time.

The arms arn't perfect by any means but they should work OK.  I started with very rusty and pitted arms.  It would have been nice to get them looking as great as "Bullitts" UCA's but they were too pitted for that.


Here's a before shot after they had been sandblasted.
 

First, I took a flap disc on my 4" angle grinder and sanded as much of the arms as I could reach.  I finished up with a Roloc disc on a 90 degree die grinder.  A good amount of pitting came out after sanding.
 

Then I painted them with some POR-15.  A lot of guys don't like that stuff but I had it so I used it.  I thought that might hold up better than just paint since it is a suspension component.  It doesn't look like it in the picture but the POR-15 filled in some of the pitts and flowed out a lot smoother than I thought.
 

When the POR-15 was still tacky, I sprayed the arms with a coat of primer.  The next day I sprayed another few coats of primer and used some spot putty to fill in some more of the pitting.  After a few wet sandings, I primed it for the last time.
 
 
I sprayed the arms with Eastwoods "Spray Gray" paint that is supposed to look like bare steel.  It looks OK from a short distance.  Once the first coat was dry, I pressed in the UCA bushings and screwed in the upper balljoint.  Then I touched up any nicks from pressing in the bushings and cleared everything with a matte clearcoat. 

Offline hezzel

  • Sr. Member
  • ****
  • Posts: 1105
  • Matching numbers 383 Magnum ,727 at and 3:23 rear
Re: Restoration of an origonal owner 73 Challenger Rallye
« Reply #65 on: September 22, 2009 - 01:37:25 PM »
Nice Work  :2thumbs:Looks really good :woo:
1971 Dodge Challenger R/T
2019 Toyota Rav4 Hybrid

Offline Chlngrcrzy

  • Sr. Member
  • ****
  • Posts: 1410
Re: Restoration of an origonal owner 73 Challenger Rallye
« Reply #66 on: September 22, 2009 - 07:37:08 PM »
They look great. I attempted to clean mine up, but after i pulled the ball joint out it stripped the threads from one arm, so i bought a set of the tubular ones. But yours look great! :2thumbs:

Offline 426HEMI

  • Sr. Resident
  • ******
  • Posts: 5187
  • My M46 Barracuda! Member Since:October 01, 2005
Re: Restoration of an origonal owner 73 Challenger Rallye
« Reply #67 on: September 22, 2009 - 07:40:43 PM »
Looks great keep up the good work   :bigsmile:  Just wish mine was in that stage right now.   :banghead:
Got a pretty good start on my M46 optioned Barracuda restoration but now it is on hold till I can gather more funds.  Still need a few parts for it.  SIU Graduate 75 AAS Automotive Tech, 94 BS Advanced Tech Studies, 1997 MSED Workforce Education and Development

1970 M46 Barracuda
1998 Dodge Darango

Gordon

Offline burdar

  • Sr. Resident
  • ******
  • Posts: 5925
Re: Restoration of an origonal owner 73 Challenger Rallye
« Reply #68 on: September 23, 2009 - 01:48:45 PM »
After going to see the car in March, I brought the body stands back home with me.  The welds weren't very good and the casters were way too small.  After sitting in one place for any length of time, the casters would develop flat spots and the car was impossible to move.   I think the 4" casters probably had a load rating of less than 200 lbs.   I wanted to rebuild the stands and use bigger casters.  Here's what they looked like before.


I had a guy at work redo all the welds for me and then I cleaned and painted everything else with some "hammer" finish paint.   I found some 6" casters at Menards that have an 800 lbs load rating so they should role a lot better and not colapse like the other ones did.  This time I went with two swivel and two fixed casters instead of 4 swivel units that I had the first time.  I wanted these to look nice so I can try selling them once the car is back on its own tires.  Plus, I didn't want to bolt nasty looking stands on a freshly painted car.  Here's what they look like now.
   

Offline burdar

  • Sr. Resident
  • ******
  • Posts: 5925
Re: Restoration of an origonal owner 73 Challenger Rallye
« Reply #69 on: September 29, 2009 - 10:23:43 AM »
Well, I got a little more work done over the weekend...accually it was a lot of work getting these things looking good again.  First, I power washed the headlight buckets but that didn't do much of anything.  Next, I tried using a cleaner/degreaser but that didn't do a whole lot either.  Finally, I just used soap/water and "000" steel wool.  A small screw driver came in handy to get some of the caked on dirt off before rubbing it clean with the steel wool.  The pot-metal pieces were just cleaned with a toothbrush and soap/water.  The gold coating on them still looks pretty good.

Once the buckets were clean, I sprayed them with a gloss clear to bring back a little of the shine.  I reasembled everything and then re-applied the paint markings that I found while cleaning.

Before


After


« Last Edit: November 25, 2011 - 10:15:24 AM by burdar »

Offline 4THECHALLENGE

  • Jr. Member
  • **
  • Posts: 374
Re: Restoration of an origonal owner 73 Challenger Rallye
« Reply #70 on: September 29, 2009 - 12:36:01 PM »
 :faint:

Offline dutch

  • Sr. Resident
  • ******
  • Posts: 6944
Re: Restoration of an origonal owner 73 Challenger Rallye
« Reply #71 on: September 29, 2009 - 01:02:35 PM »
 :iagree:      :faint:     are you sure you`ve got the correct paintcodes for that...?  :biggrin:

nice work...  :2thumbs:
« Last Edit: September 30, 2009 - 05:35:10 PM by dutch »
*** Bart ***

Offline burdar

  • Sr. Resident
  • ******
  • Posts: 5925
Re: Restoration of an origonal owner 73 Challenger Rallye
« Reply #72 on: October 02, 2009 - 01:35:18 PM »
Thanks for the comments.  I think they turned out pretty good.  The colors I used weren't anything special.  I just tried to match the colors I found as much as possible with what was easily available to me.  I think the red and blue are pretty close to what I saw.  The orange is dead nuts on what was origonally there.  At first I though both of the upper buckets had orange paint on them.  Once I started cleaning, there was a definate color difference.

Right now I'm cleaning up the rear shackles and the windsheild washer motor.  I thought about buying new but I need to re-use as much as possible to keep the cost down.  Besides...it gives me something to do until the body is back home.   

Offline burdar

  • Sr. Resident
  • ******
  • Posts: 5925
Re: Restoration of an origonal owner 73 Challenger Rallye
« Reply #73 on: October 02, 2009 - 02:20:57 PM »
OK...I guess it's time to post some more updates on the body.

When I went out to Ohio in March, I looked at a test spray of the body color.  I thought the sample was too dark and also though the metalic needed to be a little heavier.  The car had been repainted at least once, so holding the sample up to one of the fender louvers wasn't very helpful in determining the correct color.  The shop manager said he would shoot a couple more test sprays and send them to me for final approval.

A few weeks went by and I got some samples in the mail.  All three samples were very close to each other so I thought making the right choise was going to be difficult.  It was then that I remembered that the origonal trunk lid for the car was still in my parents shop.  The lid had been repainted in the late 70's or early 80's but the factory jack instruction decal was still in place.  I also remembered seeing an inspection stamp on the underside of the lid as well.  I drove over to my parents place and carefully pealed the jack instruction sticker off the trunk lid.  I held all three samples up to the origonal paint and felt pretty comfortable that I made the right choise.  Just to be sure...I called my best friend Paul and asked for his opinion.  He came over the next day and picked the same color as I did. 

The only difference in the origonal color and the color I picked, was that the metal flake was more pronounced on the lid than in the sample.  I told that to the shop manager and he said that the factory didn't really care if they got full coverage on areas like that.  He said the appearence of the metal flake can change depending on if the paint was just misted over the panel, or if a really good coat was layed down.  He thought the heavier metal flake was just because the underside of the trunk lid didn't see full paint coverage.

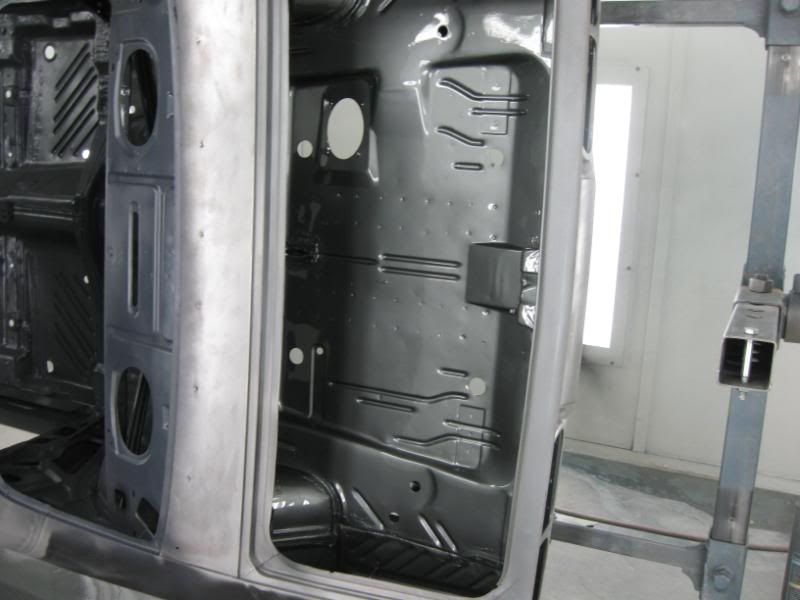
With the paint color chosen, I had to decide if I wanted the underside sprayed body color or sprayed with the factory color primer with body color overspray.  I know it's not correct, but I decided on having the underside sprayed body color.

So...at the end of April, the inside of the trunk, engine compartment, front wheelwell areas and underside were sprayed with JA5 dark silver metallic. :cooldancing:


Here's the inside of the trunk.

Offline mcgheejt

  • Full Member
  • ***
  • Posts: 654
Re: Restoration of an origonal owner 73 Challenger Rallye
« Reply #74 on: October 02, 2009 - 03:50:44 PM »
This is a great thread of your work.  That car is going to shine when it is finished.  Can't wait to see more  :popcorn: