Author Topic: Restoration of an origonal owner 73 Challenger Rallye  (Read 196996 times)

Offline coupman35

  • Full Member
  • ***
  • Posts: 506
  • It going to be FUN
Re: Restoration of an origonal owner 73 Challenger Rallye
« Reply #150 on: August 21, 2010 - 03:55:46 PM »
That very nice burdar ,it getting great job :2thumbs:
1941 Dodge truck 340cu
1935 ford 3window coupe 327cu
1965 Acadian Beaumont Convertible 283cu
1973 Challenger 318cu


Offline burdar

  • Sr. Resident
  • ******
  • Posts: 5925
Re: Restoration of an origonal owner 73 Challenger Rallye
« Reply #151 on: October 07, 2010 - 01:25:21 PM »
Thanks for the compliment.  Your car turned out really nice :thumbsup:

I've spent more time trying to figure out how things go back together than accually bolting things on the car it seems like.   The ICCA fastener guide has been a big help, figuring out what bolt goes where. 

All the door mechanisms and tracks are installed.  The door latches have been cleaned up, greased and installed.  I need to get new door locks and then the outside handle can go back on.  I found a place on E-bay that sells lock kits but they havn't returned any of my e-mails.  It kind of makes me worried about doing buisness with them if they can't return a simple e-mail.

I got the fuel fill tube cleaned up pretty good and installed.  It doesn't look perfect(it was in worse shape than I though)but I didn't want to paint it.  They never look right painted.

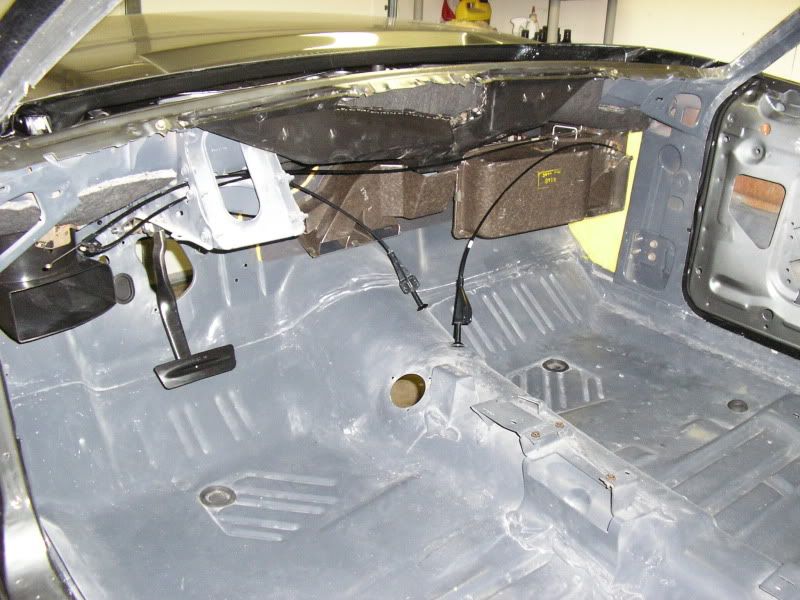
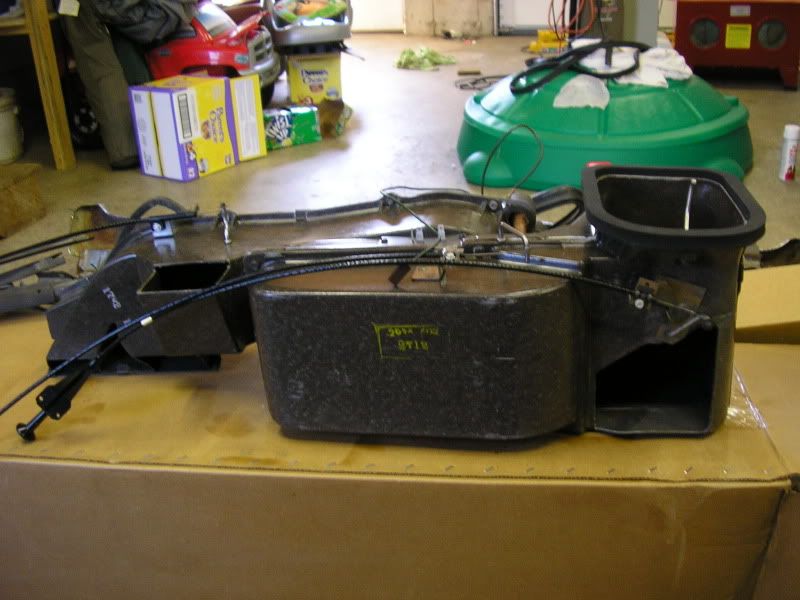
The under dash components are all restored and installed.(heater box, dash vent, brake/throttle pedal, left fresh air duct and e-brake mechanism)  THe only thing that isn't installed yet is the antenna cable.  The new bezel I bought doesn't fit the top of the fender so I'll need to have the origonal one rechromed.  The shift linkage is installed too.  That spring on the linkage is sure a strange set-up.  That took awhile to figure out even with reference pics.   I don't know how that spring stays attached but it does.

I've got more pics that I need to download to my photobucket account so some of these aren't up to date.

heater box before


heater box after cleaning and new gaskets......It's not perfect but it was the best I could do.  It had been sitting up in a very hot attick for many years and I think it warped a bit.  The cover was very hard to get back on.  It looks a lot better than it did though.  I smoothed out the broken corner of the passengers side fresh air opening.  It doesn't look factory but it doesn't look broken anymore either.


Offline burdar

  • Sr. Resident
  • ******
  • Posts: 5925
Re: Restoration of an origonal owner 73 Challenger Rallye
« Reply #152 on: October 07, 2010 - 01:48:48 PM »
For the radiator support blackout, I wanted to get it as close as I could to how the factory sprayed it.  Unfortunatly I didn't document it when I took the car appart.  The only pictures I had didn't show me much.  These are the only two I had.


I decided to try and lighten up the one front end picture to see if any detail would somehow show up.  This is what became visable.


What you see on the passengers side is what I tried to copy.  I used SEM Trim Black and I think it turned out good.  I also used it for the front valence blackout and along the rocker pinch welds.  I still had the origonal front valence, so I cleaned it up and the blackout was still visable.


Offline Bullitt-

  • Permanent Resident
  • *******
  • Posts: 12167
  • Better Things To Come Member Since 2/16/06
Re: Restoration of an origonal owner 73 Challenger Rallye
« Reply #153 on: October 07, 2010 - 04:05:41 PM »
Nice detail.  :thumbsup:
Wade  73 Rallye 340..'77 Millennium Falcon...13 R/T Classic   Huntsville, AL
Screwed by Photobucket!

Offline burdar

  • Sr. Resident
  • ******
  • Posts: 5925
Re: Restoration of an origonal owner 73 Challenger Rallye
« Reply #154 on: October 19, 2010 - 10:46:51 AM »
Someone wanted to help dad install the E-brake cable.


Offline Challenger III

  • Sr. Member
  • ****
  • Posts: 1290
Re: Restoration of an origonal owner 73 Challenger Rallye
« Reply #155 on: October 19, 2010 - 10:52:50 AM »
Someone wanted to help dad install the E-brake cable.

How cool is that!!!  :2thumbs:
Mike    Yakima, Washington

Resto Thread:  http://www.cuda-challenger.com/cc/index.php?topic=66668.0

Offline burdar

  • Sr. Resident
  • ******
  • Posts: 5925
Re: Restoration of an origonal owner 73 Challenger Rallye
« Reply #156 on: June 07, 2011 - 12:06:15 PM »
Wow, it's been awhile since I posted anything in this thread.  I didn't do much over the winter since the wife needed to get her car in the garage.  As soon as the weather warmed up I kicked her car back out into the driveway.

I guess I left off at the E-brake cable so I'll start there.....

The E-brake mechanism was in decent shape.  It was just covered in surface rust.  After a short bath in EvapoRust, it was looking a lot better.
 

The paint on the arm was a little worn so I resprayed it.  After that, I bought a small jar of white "Testors" paint and painted the letters on the brake reliece handle.  After the paint had dried, I dipped a rag in mineral spirits and cleaned the paint off of the face of the handle, leaving the recessed areas painted.
 
« Last Edit: June 07, 2011 - 12:08:21 PM by burdar »

Offline burdar

  • Sr. Resident
  • ******
  • Posts: 5925
Re: Restoration of an origonal owner 73 Challenger Rallye
« Reply #157 on: June 07, 2011 - 12:29:29 PM »
The bodyshop sprayed the tail light housings with paint even though they looked great to begin with.  I spent some time and cleaned the paint off of them.  Then I polished the origonal lenses before screwing them to the housings with new gaskets from DMT.


I stuck rags inside the horns and bead blasted them before respraying in gloss black.  The plating on the attaching bolts was still in good shape.  They just needed a good cleaning.  I did spray them with a clear coat to bring back some of the color.
 

The bodyshop also sprayed the hood latch and reliece mechanism with paint.  I didn't like the painted look so I blasted them.  Then I dipped them in the black oxide solution I've been using on the fasteners.  For what ever reason, they turned brown instead of black.  That's OK since they were origonally brown anyway.  I have them sealed with Caswell sealer but will most likely reseal them with RPM from ECS Automotive in the near future.  I also blasted and dipped the safety hook and pop-up spring.  The hook also turned brown but the spring turned turned black.  A quick buff with a shop rag gave the spring a nice new gray look.  I'm pretty happy with how they look.


Offline burdar

  • Sr. Resident
  • ******
  • Posts: 5925
Re: Restoration of an origonal owner 73 Challenger Rallye
« Reply #158 on: June 07, 2011 - 12:44:10 PM »
Started bolting some things in the engine compartment.   These are old pictures but show some of the progress.  Since these pics were taken, all the wiring has been installed as well as the master cylinder.  I'm waiting to get the dash back in the car so I can route all the wiring where it needs to be.


Before installing the ECU, I need to find an 8 digit number stamper so I can restamp the part number/date code on the new one.


I refinished the charcole canister with SEM Trim Black.  I'm going to take it out again and respray it with SEM Landau black for a little more gloss.  I masked off the top of the canister before spraying the sides to preserve the origonal date code stamp.

Offline burdar

  • Sr. Resident
  • ******
  • Posts: 5925
Re: Restoration of an origonal owner 73 Challenger Rallye
« Reply #159 on: June 07, 2011 - 01:19:14 PM »
About a month and a half ago, the guy that did the bodywork/paint on the car came over to help me with a few things.  First, we worked on the fender mounted turn signals.  The holes in the fenders had been drilled for the 72 style light by mistake.   We masked off the top of the fenders and used an air grinder to slowly enlarge the holes from 1/2" to 5/8" so the socket would fit. 

The 73+ fender mounted turn signals were held on with a screw instead of a stud/nut like the earlier years.  Since the fenders were drilled for a 72 light, I now had a large hole for a stud to pass through instead of a small hole for a screw.  I went to the hardware store and found a small stainless bolt that had the same philips head as the origonal screws.  Now the lights are held on with a bolt/nut but still look correct from up above.  The underneith will be covered up by the headlight splash sheilds so that looks correct too.

Next, we trimmed the bottom of the vinyl top and installed the stainless trim.  The top was left long since I didn't supply the bodyshop with the stainless.  I bought some buffing wheels from Harbor Freight and polished all the stainless myself. 
     

The new plastic clips for the vinyl top stainless are junk.  They don't hold the stainless tight to the body.  I'm going to take the trim back off and install the bolt-on clips like 1970 used.  That means drilling some more holes but it has to be done.

Offline burdar

  • Sr. Resident
  • ******
  • Posts: 5925
Re: Restoration of an origonal owner 73 Challenger Rallye
« Reply #160 on: June 07, 2011 - 01:40:10 PM »
The last thing we worked on was the headliner.  Insulation was glued to the roof and the domb light wiring was put in place.


The installation actually went pretty well.  I think that was due to the type of headliner I bought.  It is the correct Yorkshire material for 73 and 74.  It kind of looks like corduroy.  The top had been sitting in a box, all wadded up for a few months and there were no wrinkles in it at all.   It came from Dante's parts and took 2 weeks to get because it was a special order item.

I had a lot of clamps so we put them to good use...
 

Finding the holes under the top wasn't that big of a deal either.  I still have the origonal headliner and was able to lay it out on the floor to use as a referance.  I took the rear view mirror apart and sprayed the base with SEM Trim Black paint.  The shaft was sprayed with Eastwoods Tank Tone paint and then sprayed with a matte clear.  The mirror and rubber suround cleaned up with just soapy water. 
 

The shoulder belts were in good shape but they had been sitting in an open box for the last 13 years.  I folded them up, wrapped some rubber bands around them, put them in an old pillow case and threw them in the washing machine.  They came out looking almost brand new.  They look green in the picture but that is just due to the flash.   The origonal sun visors were cleaned up with soapy water and wiped down with some 2001 protectant.


I cleaned up all the metal interior trim and sprayed them with SEM Trim Black as well.  The rear window trim is on but I need to waite until the dash is back in to install the rest of the trim.
 

Offline burdar

  • Sr. Resident
  • ******
  • Posts: 5925
Re: Restoration of an origonal owner 73 Challenger Rallye
« Reply #161 on: June 07, 2011 - 01:56:45 PM »
Some CC.com members have posted pics of the reproduction A-pillar trim pieces.  I didn't like the look of them and according those members, they didn't fit very well either.  I decided to try an clean up my origonal A-pillars and think they turned out great.

I cleaned them four times before painting.  Once with soap/water and then with Simple Green.  Next, I wiped them down with mineral spirits.  Finally, right before painting, I cleaned them with an adhesive remover.  I sprayed SEM Adhesion Promoter per the dirrections on the can followed by two mist coats of SEM Landau Black.  I used the same process on the kick panels.  They were in pretty bad shape.  They had turned gray and needed three coats of paint but still turned out really nice.

Here is a finished A-pillar trim piece next to one that had only been cleaned with soap/water.  It doesn't even look like it's painted.  The Landau black very closely matches the origonal gloss of the plastic.

Offline burdar

  • Sr. Resident
  • ******
  • Posts: 5925
Re: Restoration of an origonal owner 73 Challenger Rallye
« Reply #162 on: June 07, 2011 - 02:18:09 PM »
OK, this is going to be the last of the pics for now.  This past weekend I redid the grill.  It was in decent shape but the plastic had discolored and looked old.
 

SEM Trim Black is a perfect match to the origonal color of the plastic.  I matched it against a section of the grill that hadn't been exposed to the elements.  I sprayed the grill on Friday night.  It was very hot an humid so I think that had something to do with how the paint dried.  I looked at the grill on Saturday morning and it looked awful.  The paint was very blotchy and uneven.  Since I didn't think I could screw it up any further, I decided to try and lightly rub it down with some steel wool.  Well, it worked...the steel wool evened out the finish and took away the small orange peel look of the paint.  I then masked off the grill and painted the leading edge silver.  I used Mopar Rallye Wheel paint and it is a very close match to the origonal silver.

I had three Challenger grill emblems to choose from.  I cleaned up all of them and picked the best one.  I took a Q-tip and put some petrolium jelly on the end of it.  I used the Q-tip to apply a very thin layer of petrolium jelly to the face of the emblem.  Then I sprayed the entire thing with SEM Trim Black.  After a few minutes, I just wiped off the petrolium jelly and cleaned up the edges with my fingure nail.

The front rubber bumper filler section was lightly sanded with very fine wet/dry sandpaper and cleaned up very nicely.  The other two end pieces also cleaned up the same way.   
 
Here is the finished grill...
   

Here's what it looks like on the car...


Offline wally426ci

  • Sr. Resident
  • ******
  • Posts: 5095
    • maryland mopars
Re: Restoration of an origonal owner 73 Challenger Rallye
« Reply #163 on: June 07, 2011 - 02:30:14 PM »
 :wow: Amazing. So this is what a Brand New Challenger looked like!  :droolingbounce:
{OOI====I====IOO}
      '71 Challenger
      [O[]=====[]O]
      '68 D100

Offline Jocigar

  • Jr. Member
  • **
  • Posts: 251
Re: Restoration of an origonal owner 73 Challenger Rallye
« Reply #164 on: June 07, 2011 - 04:00:35 PM »
Thanks for the detailed resto pics

It looks amazing!!  :wow:  you must be feeling the itch when it this close to completion

One question... how do you guys know/remember where everything is routed ?