Photobucket Tutorial

Author Topic: Photobucket Tutorial  (Read 16178 times)

Offline the_engineers

  • Resident
  • *****
  • Posts: 2639
  • Cheap, fast, reliable...pick 2
Photobucket Tutorial
« on: July 06, 2010 - 04:15:19 PM »
As anyone who has spent some time on this site is well aware, the Uploader is a severe limitation.  As much as the admins try to keep up, it’s a monumental task to keep up with the 8000+ members and 600,000+ threads.  On top of that, there is the added responsibility to decipher each picture and decide if it is worth keeping or not.

In the spirit of “once and for all” efforts, I’ve made my best attempt at a tutorial for uploading Photobucket pictures.  I no longer use the Uploader, and I think that after you’ve used Photobucket once or twice, you won’t, either.

Step 1. Register with Photobucket (www.photobucket.com).  It’s free and handy for more than just for the forum.
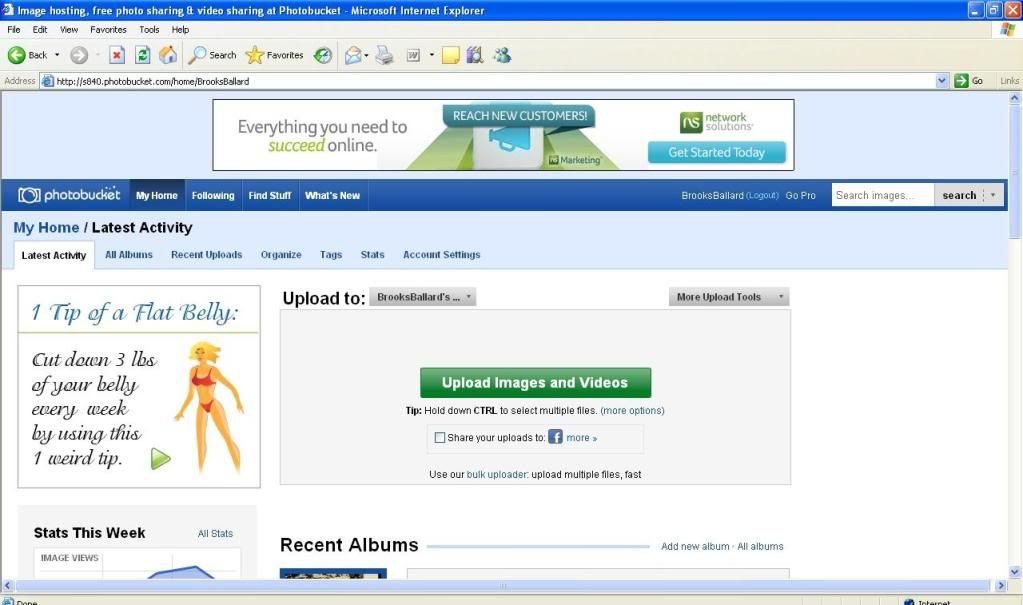
Step 2. Log in and upload your pics.
Once you’ve logged in, click on the large Green “Upload Images and Videos” button in the center of the screen to upload pictures.


Once you’ve clicked the Upload button, a pop-up will appear allowing you to browse to where your pictures are stored.


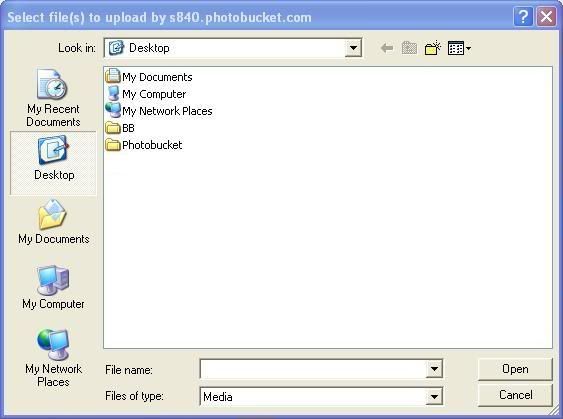
You can select multiple pictures to upload by using the Shift key to select groups or Ctrl key to select multiple, individual pics.  Once you’ve clicked OK, you’ll see a status bar to let you know your upload progress.


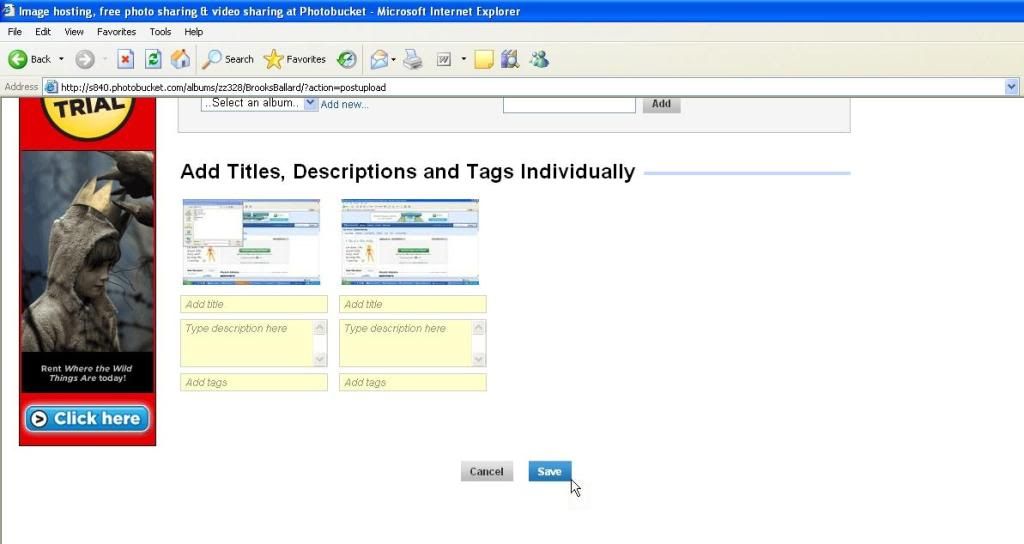
After the upload, you can add tags, titles or meaningful names to describe your upload.  Photobucket is a community, so anything you upload (with a basic membership) can be seen by others.  Naming your files increases the chance that they can be searched and found (good or bad, depending).

You do not have to add any info here.  I rarely do.

Click Save when you’re done.


Step 3. Copy your Photobucket pics into Cuda-Challenger.com
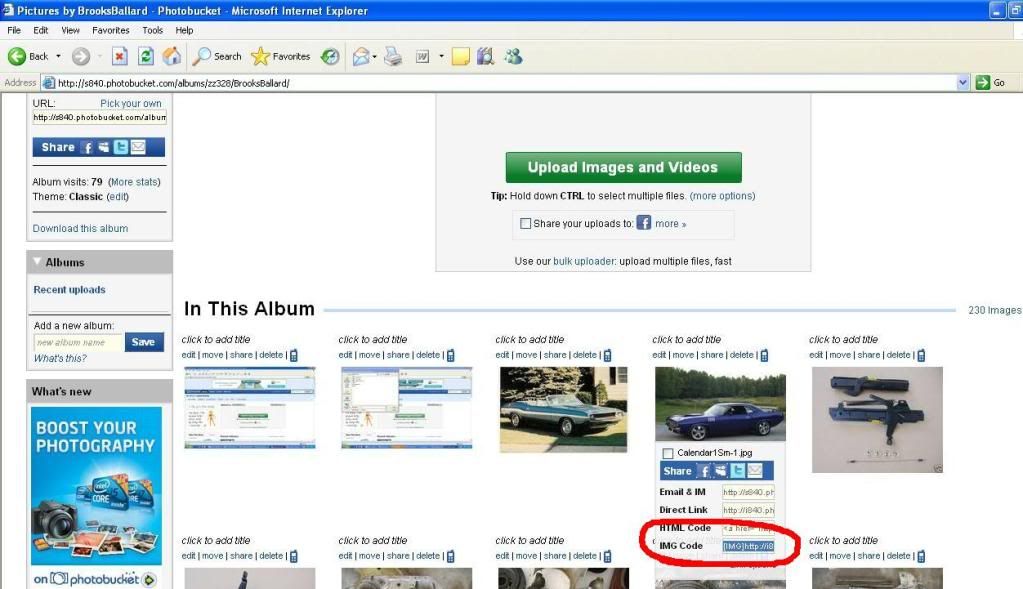
There are a couple of ways to copy the address that you want from Photobucket so that it can be pasted into C-C.com.

Hover your mouse pointer over the thumbnail that you want to copy.  Links for Facebook, Twitter, email and HTML will show up in the drop-down menu.  You want the IMG code.  A single click will highlight the entire line, then either right-click and select Copy, or hit the classic Ctrl C combination.


Go to the Cuda-Challenger.com thread editor and right-click and select Paste.

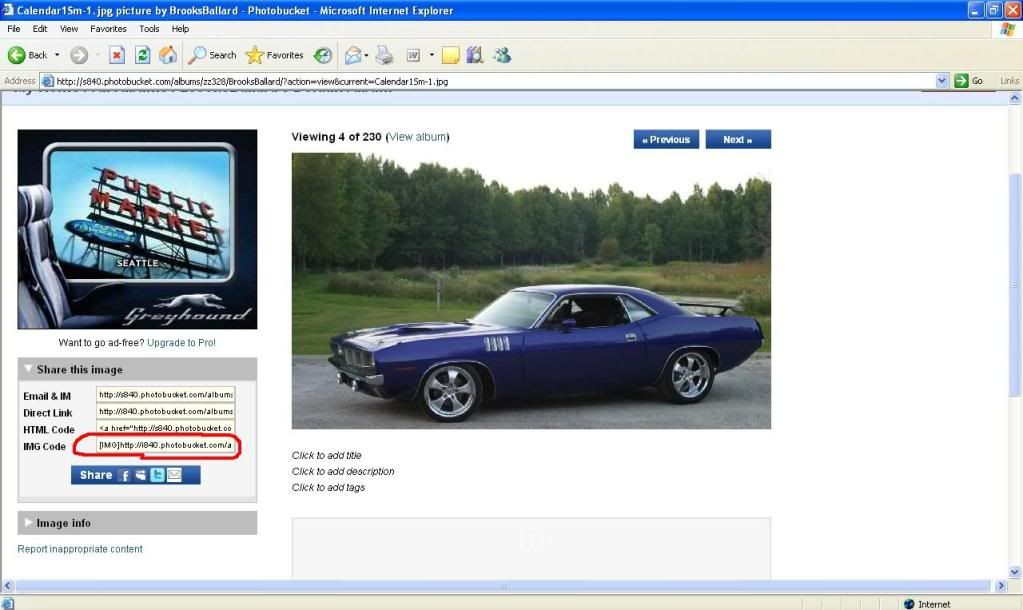
Another option is to click on the picture that you want to link.  On the left side, you’ll see the IMG link information.  Click to highlight as before, copy and paste the IMG code into the thread editor as before.  This method may have advantages if you have a fickle mouse or browser that limits drop-downs and pop-ups.


Click Post and you’re done!

...and "Yes", these screenshots are hosted on Photobucket!
« Last Edit: July 06, 2010 - 04:23:59 PM by the_engineers »
Brooks

1971 'Cuda 360
2004 Infiniti G35 6-spd Coupe
2001 Toyota Solara Convertible
2002 GMC Savana 1500 Explorer Hightop Conversion
1972 Dodge Dart Swinger...keeping the Slant.  Rocking the turbos.


Offline EB3-GranCoupe

  • Sr. Member
  • ****
  • Posts: 1435
  • BP23 U0B
Re: Photobucket Tutorial
« Reply #1 on: July 06, 2010 - 08:33:15 PM »
ok!  you sold me! 

Offline the_engineers

  • Resident
  • *****
  • Posts: 2639
  • Cheap, fast, reliable...pick 2
Re: Photobucket Tutorial
« Reply #2 on: July 06, 2010 - 10:55:31 PM »
 :roflsmiley: Thanks!
Brooks

1971 'Cuda 360
2004 Infiniti G35 6-spd Coupe
2001 Toyota Solara Convertible
2002 GMC Savana 1500 Explorer Hightop Conversion
1972 Dodge Dart Swinger...keeping the Slant.  Rocking the turbos.

Offline Chlngrcrzy

  • Sr. Member
  • ****
  • Posts: 1410
Re: Photobucket Tutorial
« Reply #3 on: July 06, 2010 - 11:34:09 PM »
I too ave been converted.   :woo:

Offline MEK-Dangerfield

  • C-C.com Expert
  • ********
  • Posts: 20946
  • I don't get NO respect! Member since 1/25/2002
Re: Photobucket Tutorial
« Reply #4 on: July 07, 2010 - 04:37:50 AM »
Maybe we should "sticky" this thread.    :lol:

Mike

1970 Challenger - SOLD
2016 SXT+.  1 of 524 SXT+'s in Plumb-crazy for 2016.

Offline Aussie Challenger

  • Resident
  • *****
  • Posts: 3407
  • In Kansas loaded for Drive to West Coast.
Re: Photobucket Tutorial
« Reply #5 on: July 07, 2010 - 06:21:30 AM »
Maybe we should "sticky" this thread.    :lol:
I'll second that,  +2   :bigsmile:
Dave

Offline Bullitt-

  • Permanent Resident
  • *******
  • Posts: 12167
  • Better Things To Come Member Since 2/16/06
Re: Photobucket Tutorial
« Reply #6 on: July 07, 2010 - 08:57:44 AM »
I have found that using Firefox browser with the Add Block Plus add-on make photobucket much better as well as most other sites. 
Wade  73 Rallye 340..'77 Millennium Falcon...13 R/T Classic   Huntsville, AL
Screwed by Photobucket!

Offline tactransman

  • Sr. Resident
  • ******
  • Posts: 5401
  • 1973 Challenger- Member here since April 14, 2006
Re: Photobucket Tutorial
« Reply #7 on: August 04, 2010 - 12:04:59 PM »
I have found that using Firefox browser with the Add Block Plus add-on make photobucket much better as well as most other sites.
:iagree:
Terry-tactransman 
Torqueflite/Automatic Transmission Specialist
Union, Mo.
Give a man a fish and he eats for a day,teach him to fish and he eats for a lifetime.

Offline 30below

  • Jr. Member
  • **
  • Posts: 273
Re: Photobucket Tutorial
« Reply #8 on: September 22, 2010 - 09:28:45 AM »
Can you resize on Photobucket?

Offline Bullitt-

  • Permanent Resident
  • *******
  • Posts: 12167
  • Better Things To Come Member Since 2/16/06
Re: Photobucket Tutorial
« Reply #9 on: September 22, 2010 - 09:31:40 AM »
Can you resize on Photobucket?
You can resize crop & a lot of other things....I have all of my photos resized automatically as they are uploaded to 17" screen size, one of several options.
Wade  73 Rallye 340..'77 Millennium Falcon...13 R/T Classic   Huntsville, AL
Screwed by Photobucket!

Offline 6packCuda

  • Sr. Member
  • ****
  • Posts: 1932
  • Eagle, NE... Member since 11/17/06
Re: Photobucket Tutorial
« Reply #10 on: September 22, 2010 - 02:19:53 PM »
I'll second that,  +2   :bigsmile:

I 3rd that. I don't know why people are so reluctant to use it. It's really simple.
Dave

Offline MizzouRT

  • Full Member
  • ***
  • Posts: 540
Re: Photobucket Tutorial
« Reply #11 on: May 09, 2012 - 05:05:24 PM »
Always wondered how this was done, never noticed the IMG list box on photobucket.  Now to see if I can successfully follow instructions with a test image:

Daily Driver: 2013 Challenger SRT 6 speed
Toy: 1970 Challenger

Offline MEK-Dangerfield

  • C-C.com Expert
  • ********
  • Posts: 20946
  • I don't get NO respect! Member since 1/25/2002
Re: Photobucket Tutorial
« Reply #12 on: May 09, 2012 - 05:43:37 PM »
You can actually post 10 photobucket pictures per post. So have at it.   :2thumbs:

Mike

1970 Challenger - SOLD
2016 SXT+.  1 of 524 SXT+'s in Plumb-crazy for 2016.

Offline hooD

  • detroit iron
  • Resident
  • *****
  • Posts: 2820
  • Motor City Made Muscle
Re: Photobucket Tutorial
« Reply #13 on: May 10, 2012 - 04:03:34 AM »
i love photobucket....been using it for a while now...click my signature pictures
-Larry
member since AUG 2007
http://www.youtube.com/watch?v=NvrWiLgDm7Y

southeastern michigan usa


1973 'CUDA 340
 
original owner
37,117 miles
  
:grinyes: *click my E-Body* :grinyes:

Offline TinCuda

  • Sr. Member
  • ****
  • Posts: 1288
    • 'Cuda
Re: Photobucket Tutorial
« Reply #14 on: July 26, 2012 - 09:38:28 AM »
marking this one
(O O [             SRT ] O O)
(O O {]{]{]||[}[}[} O O)
{||O||}

2016 Dodge Challenger Hellcat
1971 Plymouth 'Cuda 440-6
2008 Dodge Charger R/T Hemi
2015 Chrysler 200c AWD 3.6L
2000 Yamaha V-Max
Doing my part to leave a big carbon footprint!
Image Hosted by ImageShack.us
Shot at 2012-09-05