Author Topic: Look what followed me home today...  (Read 82701 times)

Offline burdar

  • Sr. Resident
  • ******
  • Posts: 5925
Re: Look what followed me home today...
« Reply #300 on: August 06, 2015 - 10:52:02 AM »
Yah, I'm glad I saw that console piece.  Otherwise, I might have walked right by you.

I haven't touched the Dart in a few months.  There just isn't enough room in the garage now that the Challenger is in there too.


Offline burdar

  • Sr. Resident
  • ******
  • Posts: 5925
Re: Look what followed me home today...
« Reply #301 on: May 20, 2016 - 11:00:20 AM »
Hey.  Its been awhile.  I haven't been in the mood to do a lot of "car stuff" so there isn't much in the way of progress on the Dart.  I've been doing a few small things here and there though.  Basically just stuff that doesn't cost a whole lot.  Stuff that doesn't HAVE to get done now but, it will make final assembly much faster if I deal with it now. 

I know there was at least one post about oil vapor separators last year.  The separator that I bought was just an empty shell which I highly doubt would have done anything at all.  I bought a BT catch can last year for my Ram truck and had a look at how they designed the inside of their product.  It looked pretty straight forward so I set out to modify the inside of the separator I bought for the Dart.  Here's what I came up with...


I used CAD(Cardboard Aided Design) to make a divider that followed the inside shape of the canister so I could separate the inlet and outlet ports.  Then I made a base with a bunch of holes drilled in it so the stainless mesh would stay in place.  Now, the oil vapor will get filtered twice before leaving the canister.


With the straight nipples that came with the canister, there was no way to cleanly route the hoses.  I bought some blemished 90 degree AN fittings cheap and attached them to the lid which will let me route the lines much easier.  The PCV inlet port on the carb is up front.  The outlet from the canister is back next to the firewall.  I had to figure out a clean looking way to get everything connected.  I had some old aluminum 3/8" fuel tubing that was just sitting around.  I used that and bent a line that goes from the carb, straight down and back underneath the Air Gap intake manifold.  Once it gets to the back of the engine, it angles down behind the passengers side head.  With all that being made out of hard line, I'll only have a few short pieces of rubber hose  connecting everything together.  I finished the oil vapor separator system by polishing the aluminum line, sanding off the logos on the canister and repainted the canister with satin Extreme Chassis Black paint from Eastwood.

Offline burdar

  • Sr. Resident
  • ******
  • Posts: 5925
Re: Look what followed me home today...
« Reply #302 on: May 20, 2016 - 11:29:47 AM »
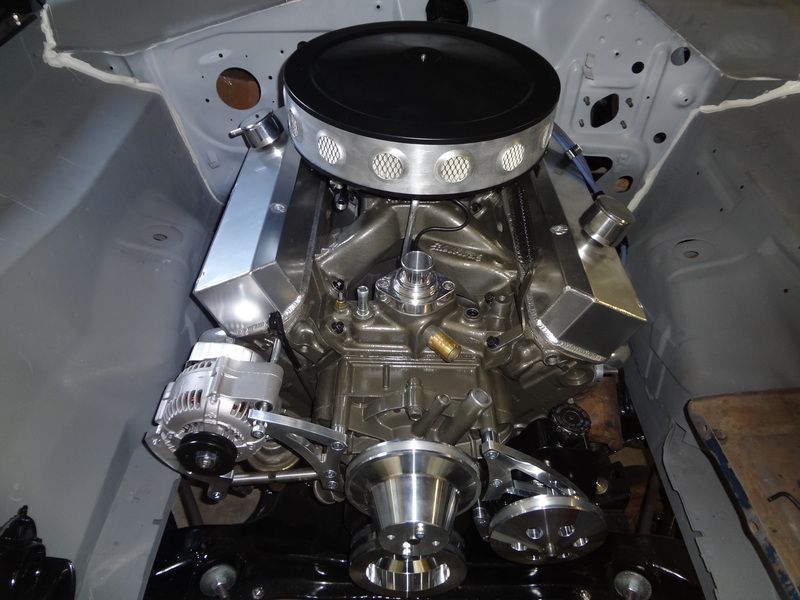
The next thing I worked on was front drive accessories.  Since I wouldn't be able to fit an electric cooling fan between the water pump and the radiator, that let me get away with a lower amperage alternator.  The Denso alternator I had previously tested was a 110amp unit but it was too thick and hit the cylinder head.  I ended up going with a 65amp which easily fit the space.  I was able to make it work with the billet brackets/pulleys that I had previously purchased.  I just had to machine some new spacers to get the pulley position correct. 

I was going to change over to a serpentine system but I already had a good amount of money invested in these brackets/pulleys so I decided to keep what I had.  Since I was originally going to change over to manual steering, I didn't have any power steering brackets and pulleys.  I purchased those separately which ended up costing a little more than the entire kit would have cost.  However, the company let me return the unused single groove crank pulley to offset some of that cost difference.  The main thing I need to do now is figure out what to do for an alternator pulley cover.  It doesn't look right without one but no one makes a cover for this metric alternator.  I might have to try and make one myself.

This is an old picture.  I have since disassembled the alternator and painted the case black.  I also purchased a billet cap for the power steering reservoir.


« Last Edit: May 20, 2016 - 11:32:55 AM by burdar »

Offline burdar

  • Sr. Resident
  • ******
  • Posts: 5925
Re: Look what followed me home today...
« Reply #303 on: May 20, 2016 - 12:15:50 PM »
On to the next project...the air cleaner.

I wanted something custom but didn't exactly know what I wanted.  I did a lot of looking at pictures on Google to get ideas.  Before I worried about the design though, I needed to see how much clearance I had to work with.  With the radiator removed and the hood closed, I was able to take some measurements.  It was going to be tight.  The Edelbrock carb really limits the amount of drop you can have on your air cleaner base.  The electric choke sticks out the side and limits you to a 3/4" drop.  With a 3/4" drop, a 3" tall filter was going to be VERY close to one of the hood braces.  I could easily use a shorter filter but I really don't like how they look.  3" is about the minimum height that really looks good IMO.  So, I found a 14" diameter open element air cleaner from Summit that was only $20.  It had a 1" drop base and came with a 3" filter.  It was cheap enough so I bought it. 

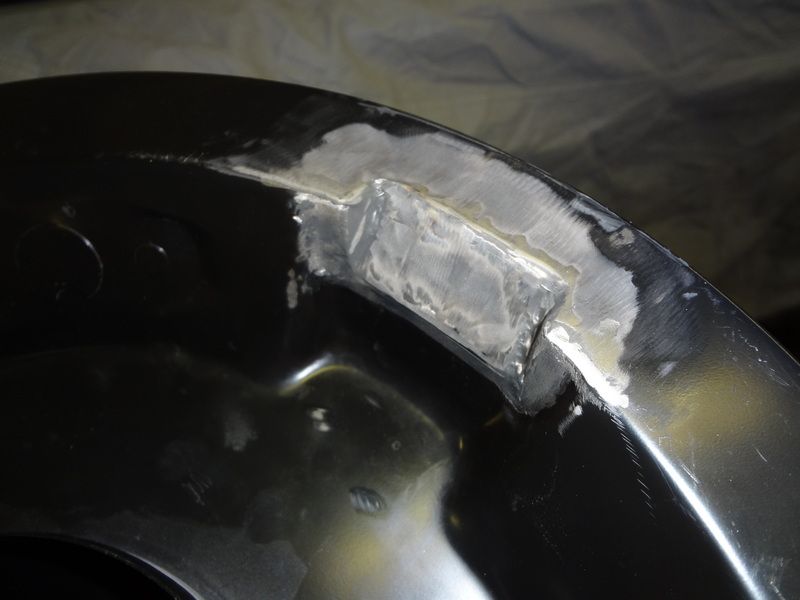
When it arrived I verified what I had read online.  The 1" drop hit the electric choke.  It was fairly close to clearing so I thought I could modify it slightly to fit.  Since I can't weld, I took the base to a friends house.   We cut a flap out of the base, bent the metal inward a little bit and welded everything back together.  Now, the 1" drop base clears the electric choke cover.  That 1/4" does make a big difference on this A-body.  I did have to slightly modify the air filter.  The notch didn't allow the filter to sit down flush on the base.  I had to grind away some of the rubber on the inside of the filter so it would lay flat.  Here is what we did to get the base to fit...
  

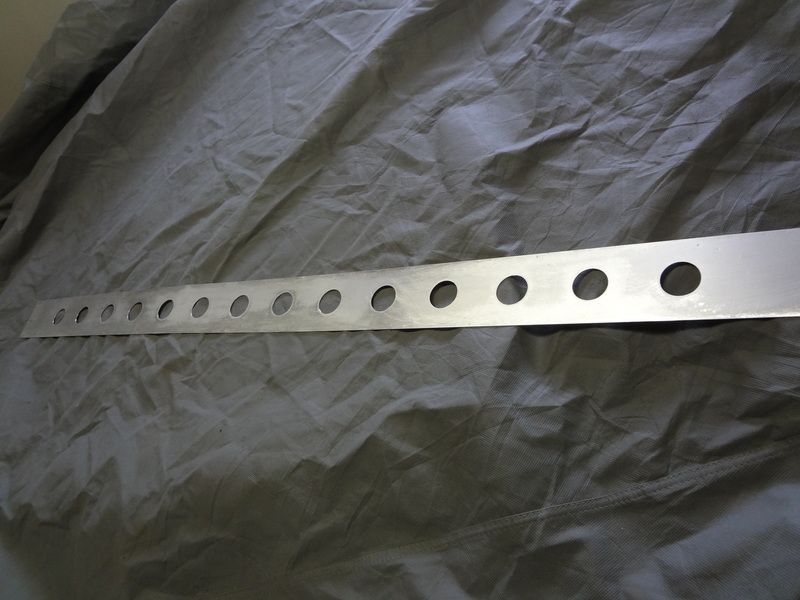
Now that I knew it would fit under the hood, I turned my attention to making it look better.  I found a design online that I thought I might be able to handle since my fabrication skills are very limited.  I went down the road from where I work and bought a piece of .025 aluminum that was 3" high and 4' long.  I tried a couple different hole layouts on paper to get the one that I liked the best.  I ended up drilling (14) 1 1/4 holes along the aluminum sheet.

I had previously purchased a 1 1/4" dimple die when I was making my trans cooler bracket.  I used that to dimple all 14 holes.
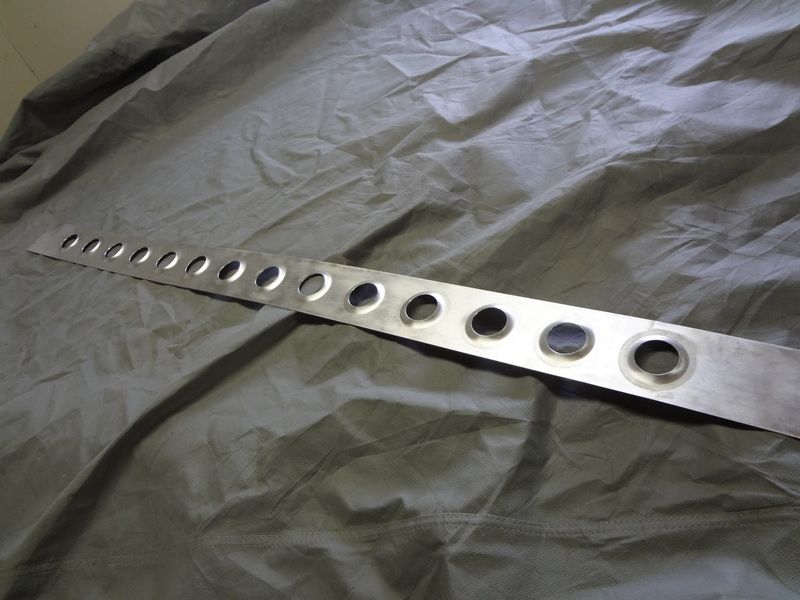

Once that was done, all that needed to be done was wrap the aluminum around the air cleaner.  I wasn't sure how the aluminum would bend with all those dimpled holes in it.  It actually bent very easily.
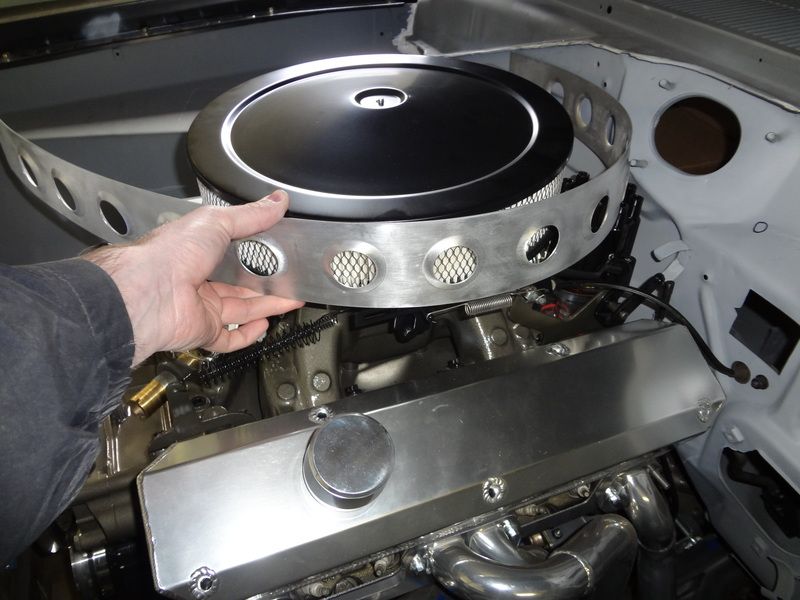

With the aluminum cut to the correct length, I riveted the ends together.  The rivets will be on the back side so they won't be seen.  There is a little gap between the air filter and the outside lips of the lid/base.  This aluminum insert fits in that gap.
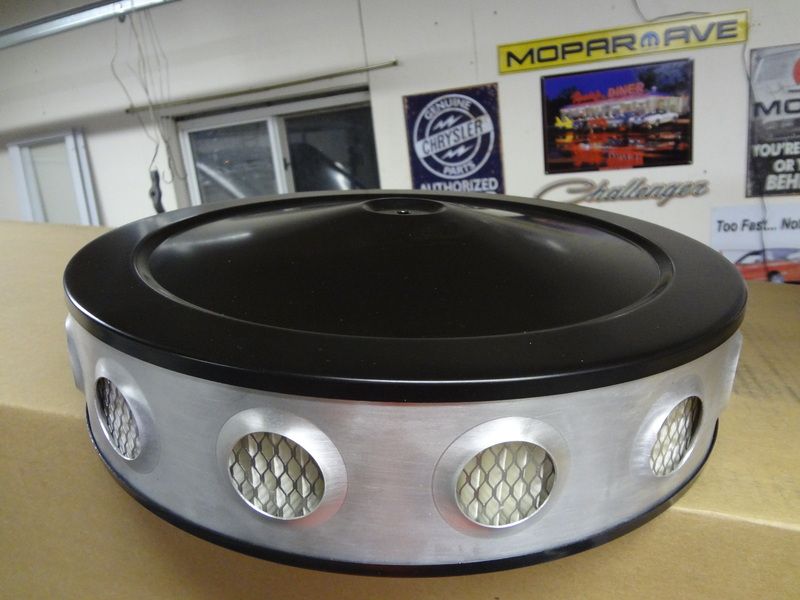

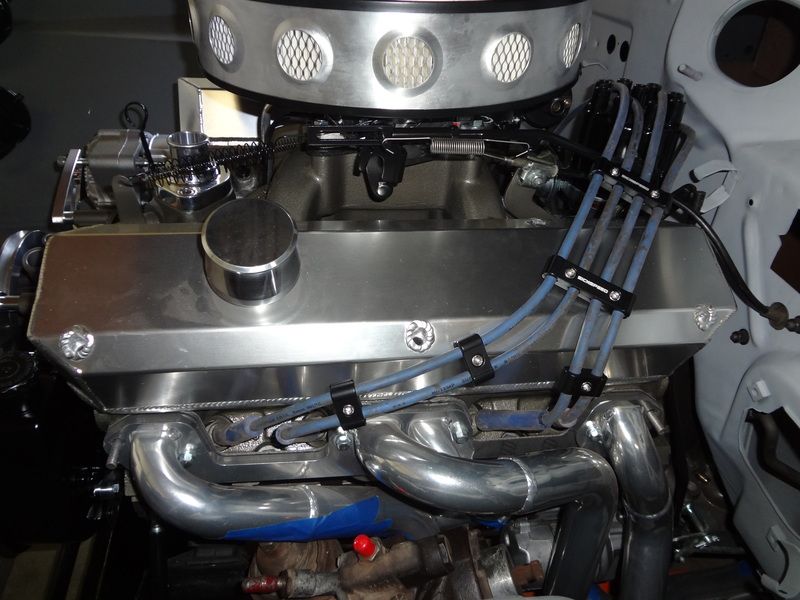
I actually don't have the hood clearance to use a standard wing nut.  I've got a custom fastener in mind to attach the air cleaner but I haven't built it yet.  Here you can see how it looks on the engine.  I also bought some aluminum plug wire separators off of Ebay.  I started playing around with plug wire routing with a set of old wires I had sitting around.  I think they'll work out nicely.

« Last Edit: May 20, 2016 - 12:29:49 PM by burdar »

Offline burdar

  • Sr. Resident
  • ******
  • Posts: 5925
Re: Look what followed me home today...
« Reply #304 on: May 20, 2016 - 01:09:49 PM »
My last project was started over a year ago and I just got around to finishing it.  Since the electric fan didn't work out, I've been building a fan shroud.


Here's where I left off...


The next step was to have the corners welded and a gusset put around the upper rad hose notch.  A friend of mine thought he could do it so he did some practicing until he was comfortable enough.  It ended up turning out fine.  Once the welding was done, I installed the shroud and made a crude tool to find the exact center of the opening.  The tool bolted to the water pump flange.  After turning the pump a few times, the bolt put a mark in the aluminum where the center point needed to be.


I found a video on Youtube on how to make a circle cutting jig.  It's a pretty simple concept and does a great job.  The jig attaches to a router and you are able to adjust the distance from the router bit to the pivot point.  I'm using a 15" fan so I made the hole 16 1/2" in diameter.  That leaves 3/4" clearance from the blades to the shroud which is what the manufacture recommends.


I used my dad's router to cut the hole.  We just went slow and didn't try to cut through all in one pass.  I think we made three passes total...lowering the bit a little farther on each pass.


This jig made a perfect circle.  WAY nicer then trying to cut it out with a jigsaw by hand.


I bought a coolant overflow bottle from Summit.  It came with two 1/4" nipples on the bottom side.  The center nipple was the inlet and the other was for an overflow if the bottle got too full.  The problem is that the overflow nipple on the radiator is way larger than 1/4".  There wasn't a clean way of connecting the two.  I ended up cutting off the 1/4" inlet line.  I drilled out the hole and installed a -6AN fuel cell fitting.  Then, I took some more of that scrap 3/8 aluminum fuel line and bent it to fit.  I used a -6AN tube nut/sleeve to connect the line to the overflow bottle.  The bottle attaches right to the fan shroud. 


I got done polishing the shroud last weekend.  This picture was taken last month so the shroud isn't polished.  You can kind of see how the overflow bottle is mounted in this picture as well.  That's it...that's all that I've done.  I might try and get a few other small things done this summer.  We will see...

Offline crash340

  • Sr. Member
  • ****
  • Posts: 1291
Re: Look what followed me home today...
« Reply #305 on: May 20, 2016 - 04:32:34 PM »
NICE work, its good to not be rushed, the outcome is often far better.
Greg

73 Cuda
Brisbane, Australia

Offline YellowThumper

  • Sr. Member
  • ****
  • Posts: 1633
  • I left the snow for this?
Re: Look what followed me home today...
« Reply #306 on: May 20, 2016 - 05:32:03 PM »
NICE work there. I have learned to accept that any progress is good progress.
I have the same oil separator. It is suppose to have a foam insert in it and one of the inside fittings has a hose that feeds the oil down to the bottom of the tank. I like your sepatator though and may steal that idea.
I also have the same radiator overflow tank. I also bent up same 3/8 hard line.

Will be making my own shroud soon. Gonna steal that router idea also.

Apparently like the way you think...


Mike
Removing the warning labels one at a time.
Nature will take care of the rest.

Offline brads70

  • C-C.com Expert
  • ********
  • Posts: 18747
Re: Look what followed me home today...
« Reply #307 on: May 20, 2016 - 09:27:40 PM »
Looks great, good to see you around here too! Hope all is well!  :wave:  :2thumbs:
Brad
1970 Challenger 451stroker/4L60 auto OD
Barrie,Ontario,Canada
Proud to own one of the best cars ever made!!!!!

My restoration thread 
http://www.cuda-challenger.com/cc/index.php?topic=59072.0
 My handling upgrade post
http://www.cuda-challenger.com/cc/index.php?topic=73985.0

Offline Bullitt-

  • Permanent Resident
  • *******
  • Posts: 12167
  • Better Things To Come Member Since 2/16/06
Re: Look what followed me home today...
« Reply #308 on: May 20, 2016 - 09:42:32 PM »
Lookin Good Darren   :woo:
Wade  73 Rallye 340..'77 Millennium Falcon...13 R/T Classic   Huntsville, AL
Screwed by Photobucket!

Offline burdar

  • Sr. Resident
  • ******
  • Posts: 5925
Re: Look what followed me home today...
« Reply #309 on: May 24, 2016 - 09:55:33 AM »
Here is the Youtube video on making the circle cutting jig.

https://www.youtube.com/watch?v=brq3wtKuv0Q

Offline burdar

  • Sr. Resident
  • ******
  • Posts: 5925
Re: Look what followed me home today...
« Reply #310 on: August 21, 2016 - 12:12:59 AM »
Picked up another 8 3/4 housing today.  When I bought the car, the owner had a bunch of C-body 8 3/4's lying around that were going to go to the scrap yard.  He let me take one for free since scrap prices were so low.  I was referred to a guy that does a lot of rear end work who was going to shorten the housing to fit the Dart.  I disassembled the rear and gave him the housing a couple years ago.  My first mistake was telling him I wasn't in a hurry.  Well, I've tried contacting him on multiple occasions over the years and he hasn't responded to any messages or texts.  I just figured I'd cut my losses and get another housing.  It turns out that the pile of 8 3/4's is still in the same spot and I was able to grab another housing.

Last year I talked to Fine Lines at Carlisle about making some lines for use with rear disc brakes.  They said they knew exactly how to make them as long as they knew what the housing was originally out of.   The axle vent was put in different places depending on year and body style.  I brought the lines with me to match up to the housings that were there.   I found a really nice one out of a truck.  56" total length with 44" perch centers.  The lines fit perfectly.  It should work really well in the Dart with a little cutting/welding.  I've got a friend looking into another person to shorten the housing.  Hopefully I'll have a plan in place next week.

Offline AARuFAST

  • AARuFAST
  • Resident
  • *****
  • Posts: 2154
Re: Look what followed me home today...
« Reply #311 on: August 21, 2016 - 12:32:14 AM »
L@@Kin Good.......    :thumbsup:
1970 AAR Cuda
1970 Gran Coupe Ragtop. 1 of 66
Gran Cpe Convertible 1 yr only.

" I Want to Ride "

" I tried to be normal once...
it was the most boring
2 minutes of my life!!!!"

Offline dakota

  • Full Member
  • ***
  • Posts: 585
Re: Look what followed me home today...
« Reply #312 on: August 21, 2016 - 09:46:06 AM »
Here is the Youtube video on making the circle cutting jig.

https://www.youtube.com/watch?v=brq3wtKuv0Q


Really nice work on the fan shroud.   What kind of bit did you use in the router to cut the circle out of the aluminum?

Here's an option for those that are looking to purchase a circle cutting jig:

http://www.rockler.com/rockler-circle-cutting-jig
« Last Edit: August 21, 2016 - 09:49:25 AM by dakota »

Offline burdar

  • Sr. Resident
  • ******
  • Posts: 5925
Re: Look what followed me home today...
« Reply #313 on: August 21, 2016 - 10:58:28 AM »
It was just a straight bit that was about 1/4" in diameter. We just made multiple shallow passes and cooled it with WD-40.

I've pretty much decided to sell the full length TTI headers and buy the shorties instead. The stock trans cooler lines don't clear the headers and they hang a little too low. I will be able to heat and crush the down pipes a little bit with the shorties if need be as well.

Offline burdar

  • Sr. Resident
  • ******
  • Posts: 5925
Re: Look what followed me home today...
« Reply #314 on: September 24, 2016 - 10:55:04 AM »
When I took my Challenger apart, all the fasteners ended up in one tub.  Then, over the years, some fasteners found there way to a handful of other places which made reassembly difficult.  On the Dart I needed to be more organized.  I bought a small plastic bolt organizer with separate trays.  Then I labeled the trays like this...

  1  2  3  4  5
A
B
C
D
E
F

The upper left tray is A1...you get the idea.  Then I wrote out a list the described what fastener is in each tray so I have a record of it.  I like this more then having 100 plastic bags sitting around.  Anyway, I previously cleaned up all of the zinc plated hardware and had them re-plated.  Then they went back in their respective trays.  The last couple weeks, I've just been opening up one tray at a time and taking out the rusty phosphate fasteners and cleaning, re-darkening and sealing them.  Then they go right back into the tray they came out of.  I've pretty much got the hardware all done.  There are a few things like the original radiator bolts that I won't be reusing.  Those will just stay in their tray until the car is done.  Then they can be thrown in with other "like" bolts that I have organized in a larger plastic bin.

The replacement 8 3/4 housing is being shortened as we speak.  It should be done early next week.  Once I confirm the measurements are what I asked for, I can order new axles and spring relocation brackets from Dr Diff.  Last week I also ordered new leaf springs.  I ended up going with MP oval track springs with 0 arch.  Hopefully they are what I need.  I really don't know how low the back end needs to be until I figure out how low I can get the front.  That's why I'm mocking everything up before the car gets painted.  I can get the ride height all sorted out and measure for wheels so I don't have any surprises after paint.  I found the springs at Summit for $110 each and would take three weeks to get.  Since they are a MP part, I called a good friend of mine who is a service manager at a Chrysler dealer.  He was able to sell them to me for $87 each and they arrived in less than a week!