Author Topic: Look what followed me home today...  (Read 82705 times)

Offline dutch

  • Sr. Resident
  • ******
  • Posts: 6944
Re: Look what followed me home today...
« Reply #45 on: December 06, 2013 - 05:17:19 PM »
nice  :grinyes:
*** Bart ***


Offline Haddixj

  • Full Member
  • ***
  • Posts: 641
Re: Look what followed me home today...
« Reply #46 on: December 06, 2013 - 05:49:49 PM »
Looks good. What kind of tumbler?

Offline burdar

  • Sr. Resident
  • ******
  • Posts: 5925
Re: Look what followed me home today...
« Reply #47 on: December 06, 2013 - 07:24:10 PM »
The tumbler is from Harbor Freight. I use the green pyramids with some degreaser.

Offline 72cudamaan

  • Resident
  • *****
  • Posts: 3248
Re: Look what followed me home today...
« Reply #48 on: December 06, 2013 - 09:26:04 PM »
Quite a few places make them.  Just search for "fabricated aluminum valve covers".  Apparently, you have to spend a huge amount of money to get quality ones.  Mine were $100 and I'm not impressed.  One of covers had a flat mounting flange.  The other did not.  I was sent a replacement "really nice and straight" cover that was worse then the first one.  I put a belt sander to the first cover and made it flat...I sent back the replacement.

There used to be a guy who made aluminum spacer plates for BB and SB so you could use stock covers with tall aftermarket rockers.  He no longer makes them though.  I need a set to space these covers up and away from the intake.  I have very little clearance using two gaskets.  I'd like a little extra room there.


I thought I saw a post recently on Moparts about these spacers.
If I cant fix it, it's broke
 
Andy  (phukker whither)

Offline Street_Challenged73

  • Sr. Resident
  • ******
  • Posts: 8826
  • '73 FC-7 Challenger..Member since October 20, 2002
    • My '73 Challenger Restoration Page
Re: Look what followed me home today...
« Reply #49 on: December 06, 2013 - 10:25:16 PM »
Nice job so far!! :2thumbs: :cheers:
1973 Dodge Challenger......................The ongoing project. (00/----\00)
1991 Dodge Stealth R/T Twin-Turbo....The sunny day cruiser (RTBoost)
1990 Toyota Celica GT Liftback...........The new daily & winter driver.
All-American Muscle: 'Cudas and Challengers...Still the Elite and always will be.


Street_Challenged73 from Wisconsin

Offline burdar

  • Sr. Resident
  • ******
  • Posts: 5925
Re: Look what followed me home today...
« Reply #50 on: December 07, 2013 - 12:34:56 AM »
Quote
I thought I saw a post recently on Moparts about these spacers.

I sent the guy a PM and he said he wasn't making them any more. He wasn't sure if he would make them again.

Offline wally426ci

  • Sr. Resident
  • ******
  • Posts: 5095
    • maryland mopars
Re: Look what followed me home today...
« Reply #51 on: December 07, 2013 - 10:41:57 PM »
Quick work man. Glad the project is moving along. I hear good results in tumblers with blasting sand as well.  :bigshades:
{OOI====I====IOO}
      '71 Challenger
      [O[]=====[]O]
      '68 D100

Offline burdar

  • Sr. Resident
  • ******
  • Posts: 5925
Re: Look what followed me home today...
« Reply #52 on: December 09, 2013 - 10:14:41 AM »
Right now I'm working on the dash assembly.  Everything is torn apart and I'm working on the individual parts.  I was surprised to see printed circuits on the back of the gauge cluster housing.  I was expecting to see separate wires going everywhere like the Challenger.  I was a little too rough removing the connector from one of the printed circuits and damaged two of the pins.  One pin was just slightly loose but the other was almost broken off.  I was worried about this for weeks and didn't know what I was going to do with it.  I read something online about a way to possibly fix them so I tried it yesterday.

The pins are hollow and I found that a paper clip could be pushed all the way through them.  I put some flux on the end of the paper clip and coated the inside of the pin with it.  With the paper clip inserted into the pin, I could manipulate the position of the pin to get it in the proper location.  Then I soldered the paper clip onto the back of the printed circuit.  The flux let the solder flow into the pin which gave it strength.  When I was done, the two loose pins were solid.  I still want to check continuity just to be sure it's fixed but it looks really good.  The loose pins were just to the high beam indicator light and one of the dash lights.

The two pins on the right were loose.  I inserted a paper clip into the pin and soldered it on the back side....then I cut the excess paper clip off the front and the back.
 

You can see the two spots on the back of the printed circuit that I soldered.

Offline burdar

  • Sr. Resident
  • ******
  • Posts: 5925
Re: Look what followed me home today...
« Reply #53 on: December 09, 2013 - 11:15:41 AM »
The car didn't come with an oil pressure gauge.  It just had an idiot light.  An oil pressure gauge wasn't even an option until they started putting the Rallye dash in them.  I'm not sure what year that was.  Maybe 1970?  I don't want to have extra gauges mounted in pods under the dash so I had to think of how to mount an oil pressure gauge and have it not look out of place.  A popular mod for these cars is replacing the factory AMP gauge with a 2" VOLT gauge.  I decided that an oil pressure gauge was more important than a VOLT gauge so I set out to do the conversion.

I purchased a 2" SunPro electric oil pressure gauge and gutted it.  The + and- terminals of the gauge were the same distance apart as the factory AMP gauge so it would fit in the same spot.  The third sending unit terminal was a problem though.  My original plan was to cut the sending unit terminal very short so it would clear the back of the gauge cluster housing.  The printed circuit is directly behind the AMP gauge so this is why I originally planned on doing it this way.  The + and - terminals of the AMP gauge stick through the printed circuit.  After looking more closely, the sending unit terminal would clear all the traces on the printed circuit if I drilled a hole in it.  So, I ended up drilling a hole through the back of the cluster housing and through the printed circuit body. 

Here is the 2" gauge mounted in place of the original AMP gauge.
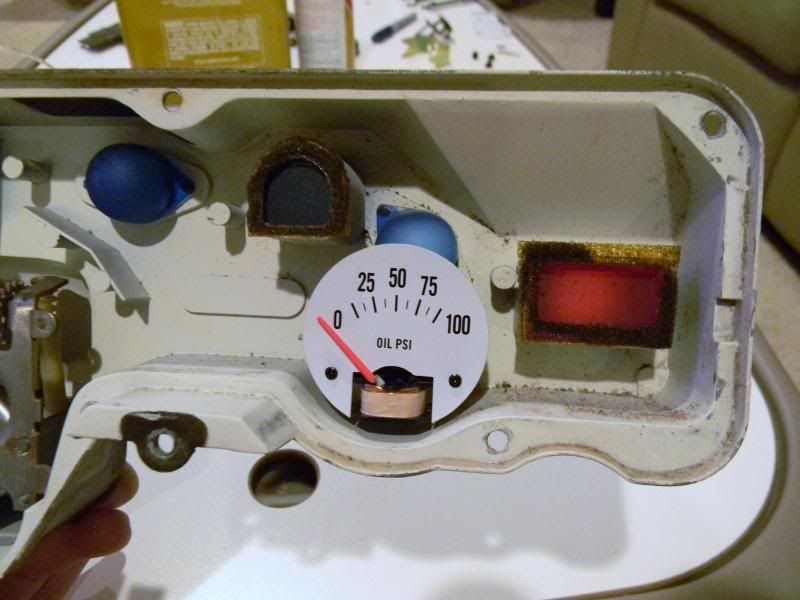
 

Next, I removed the gauge face from the new gauge.  It's just held on with two small screws.  I used the face as a template to modify the original AMP gauge face so the oil pressure mechanism would clear.  Here is the gauge without the face installed. It just barely clears the blue dash light lense.
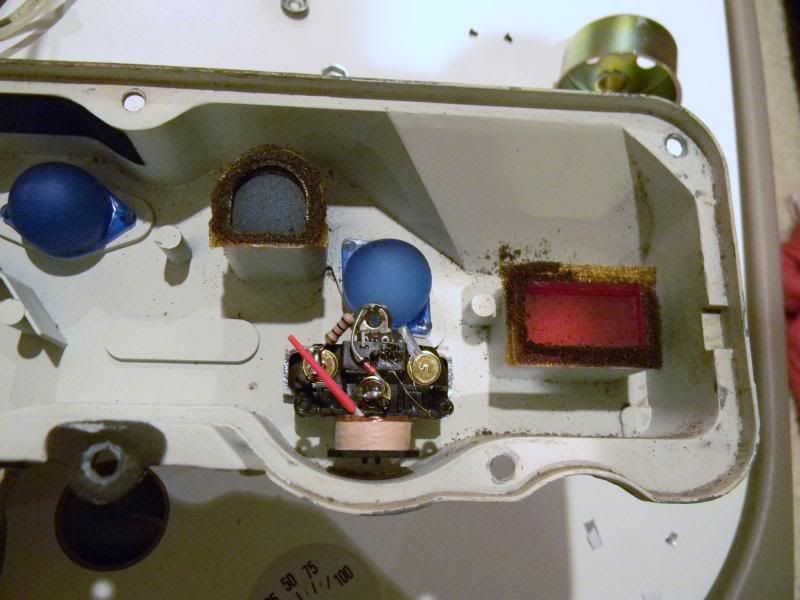

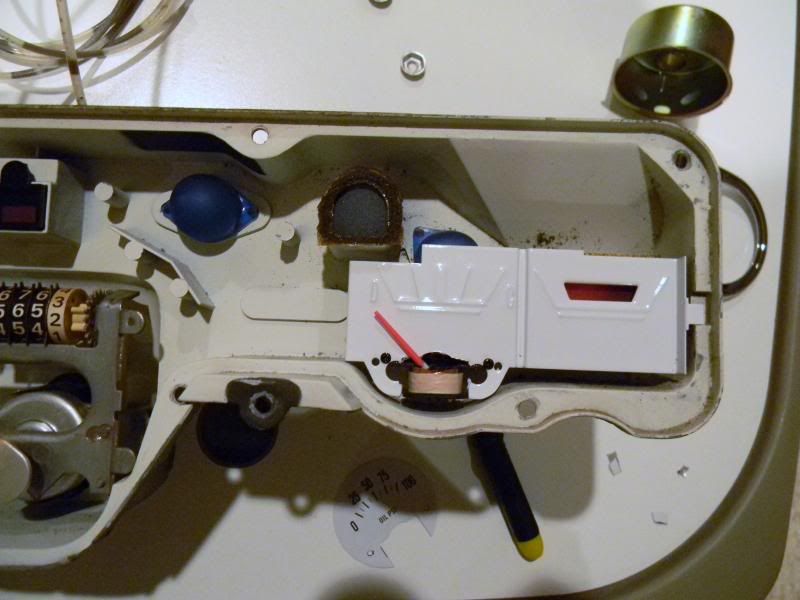
I had to drill two new mounting holes in the AMP gauge face so I could attach it to the oil pressure gauge.  Here is the original AMP gauge face mounted.  The face is white because I was experimenting with repainted the gauge faces. I will be cutting off the original AMP gauge needle and gluing it to the new oil pressure gauge needle so it will look just like the water temp and fuel level gauges on the other side of the dash.  Just to the right of the AMP gauge is the idiot light.  I'm going to keep that functional as well.  I'll just "T" off of the port on the back of the engine and run both sending units.
« Last Edit: December 09, 2013 - 11:18:33 AM by burdar »

Offline Jamiez

  • Sr. Member
  • ****
  • Posts: 1981
  • Retro
Re: Look what followed me home today...
« Reply #54 on: December 09, 2013 - 12:11:46 PM »
I discovered B bodies have the exact same type of board with the exact same problems with the pins.  It look a lot of cleaning with contact cleaner, erasers and a little light sanding to get all the paths working on mine.  I put dielectric grease everywhere I thought it might help before buttoning it back up.  You also might want to consider switching those bayonet bulbs that go in the twist housings, with LEDs.  If it's anything like a B body a burned out bulb would pretty much mean having to pull the entire dash.

Offline burdar

  • Sr. Resident
  • ******
  • Posts: 5925
Re: Look what followed me home today...
« Reply #55 on: December 09, 2013 - 12:36:55 PM »
I tried to repaint the gauge faces myself but it wasn't working very well.  I found a company that makes white face vinyl overlays so I'm going to give that a try.  I saw a picture online and it looks really good at night with the blue light on it.  I will probably be replacing the bulbs with LEDs.  One of the bulb holders is broken so I'll have to find a new one.

Offline Jamiez

  • Sr. Member
  • ****
  • Posts: 1981
  • Retro
Re: Look what followed me home today...
« Reply #56 on: December 09, 2013 - 12:49:24 PM »
This is what mine looks like after a LED swap, the LEDs are white, the blue comes from the bulb covers like your dash has.  My car is blue so it fits.  If you're going another way you might want to remove the covers and get colored LEDs / go with white LEDS


Offline burdar

  • Sr. Resident
  • ******
  • Posts: 5925
Re: Look what followed me home today...
« Reply #57 on: December 09, 2013 - 01:09:41 PM »
My car is blue with white interior so the white faced gauges should work and not look strange.  Yours looks good.  With the white faces, mine should shine a little more.  White LEDs with the stock covers will look good.  I'm trying to figure out some other subtle accents that won't look dumb.  There is so much black on the dash that I think it looks out of place with white interior.

There was a factory tach option but it wasn't in the dash.  It was mounting in front of the shifter on the console.  That will be easy to add.

Offline Jamiez

  • Sr. Member
  • ****
  • Posts: 1981
  • Retro
Re: Look what followed me home today...
« Reply #58 on: December 09, 2013 - 02:11:21 PM »
Are you going with blue carpet?   I think that'd look good with white faced gauges.

Offline burdar

  • Sr. Resident
  • ******
  • Posts: 5925
Re: Look what followed me home today...
« Reply #59 on: December 09, 2013 - 02:36:41 PM »
I looked into blue carpet.  It was an available option.  If blue carpet was ordered, the kick panels, console body and the entire dash would have been blue as well.  That would be too much.   I'm not sure if blue carpet with a black dash would look ok or not.  I was kind of considering some blue or white accents on the dash but most anything is going to look out of place.  I think the biggest problem right now is what to do with the chrome on the dash bezels.  New bezels are way expensive but chrome paint just looks silver.  I wish there was a cost effective way to get a real chrome look without spending hundreds of dollars.